In this AXLR8 FAQ section we collect some questions that often get asked by clients. If you cannot find the subject you need, please try the search function (top RHS) or click on te headings below to expand them. Also, try the courses link for training videos. Failing that, AXLR8 have a helpdesk for client support with trained consultants available during office hours.

Please also see our definitions page for some useful workforce management buzzwords!
Application Forms
5 year employment history is required in BS7858 Vetting for many regulated jobs. Secuirty, airports and care are examples.
If an applicant cannot recall all the dates or employment details then they can request this from HMRC. Please note, this could take up to 14 days to arrive.
Option 1. Apply online
https://www.gov.uk/guidance/hmrc-subject-access-request
- Go to www.gov.uk
- Search for HMRC subject access request
- Tap the link that is under how to get your requests and apply for a SAR online
- Complete with full information and submit
Apply by email – Please ensure you are emailing info.sars@hmrc.gsi.gov.uk and that you are providing all the information below
- Full name (including middle names)
- DOB (DD/MM/YYYY)
- National insurance number (AA 00 00 00 A)
- Full current address (including postcode)
- Any previous addresses (if you have moved in the last five years to your current address, please provide your previous address that you lived in)
- What years you are applying for (please ensure you request a full five years from the date you are applying. If the date today is 01/02/2025, please request from 2020 until 2025)
- Reason to why you are applying, for example; you are applying for a position at Happy Town and a five-year history check is mandatory for you to begin work with us.
Option 2. Apply by phone
Call HM Revenue on 0300 200 3300, provide all your details and ask for a five year employment history letter which you will receive by post.
Candidate Journey
You can plug this into your application process. Simply use the Employment History Question type in AXLR8 AFB (Application Form Builder).
Integrated with BS7858 in the AXLR8 Vetting module?
Then the details will go straight into the BS7858 vetting section and the emails and can be used to auto launch the reference letters to obtain confirmations of the facts from previous employers.
You will need access to the Admin menu, then click on Application Form Builder. If you cannot see the link to the Admin menu on the left hand side, please request access from your System Administrator.
There are many tools for doing this in AXLR8. Let us look at three examples.

Application Form
Using AXLR8 Application Form Builder (AFB) you can create conditional questions. These can be made to follow the logic shown in this flowchart.
Vetting Workshop
Using AXLR8 Vetting to support your BS7858 process you can collect and approve all the data you need including:
- Proof of ID
- Proof of Address
- Confirmation correspondence from 5 years employment history
- Visas and other BRP and work documents
- SIA badge checks
- Others.
The original documents s should be checked and authenticated by a qualified vetting manager
Online Checks with Rightcheck
Checking online is integrated with AXLR8 using the Rightcheck service. It works seamlessly within the AXLR8 Job Application Journey. There are more details in this article.
Feel free to contact your Support consultant if you do not find your answers in FQ or enough training material. Also, get in touch with your account manager if you have not purchased the modules listed above.
Once you have run through all your selection procedures and wish to add an applicant to your “staff bank” for shifts, you simply find their record and
- press “Promote to staff”
or
- set the JAS (Job Application Status) to a hired value as determined by your company.
then the person becomes “Staff”.
They may never actually work for you or get paid at this stage but they will have access to the Staff Portal and they can be booked for shifts and events and be able to add and update certain details in their own staff records.
At a point in your staff acquisition and selection process, you will make a decision to offer them employment and eventually hire them. We call this process “Promote to staff”. In some AXLR8 ATS systems with a high vetting requirement, the link may also be called “Invite to Interview” or similar in companies in a regulated industry with high vetting standards. Examples include security staffin, the care sector and airports.
What happens when I promote somone to staff?
Their employee record is set up and they get their welcome, offer letter explaining any further information required for acceptance/payroll and vetting processes as well as access to the AXLR8 Staff app.
Further details on the promote to staff automation.
Collecting further details post-hiring
Some employers may decide to collect certain information of a private nature after the decision to hire.
AXLR8 provides many options for this and any continual staff details updates required. The main tools are:
- AFB (AXLR8’s Application Form Builder)
- AXLR8 Vetting Module (which is for managing your BS7858 compliance) and
- the AXLR8 Staff app (also available as a web portal)
Further details on collecting data following job offer or hired stage
How to add a final message on an AppForm? Adding a thank you/completion message on AXLR8 is simple. Adding a completion message is a great way to set expectations for candidates. We recommended that All AppForms have a completion message.
Step 1 – Go to the Application Form Builder on you WebFastrack.
Step 2 – Select the Application Form that you wish to edit.
Step 3 – Go to the App form completed page
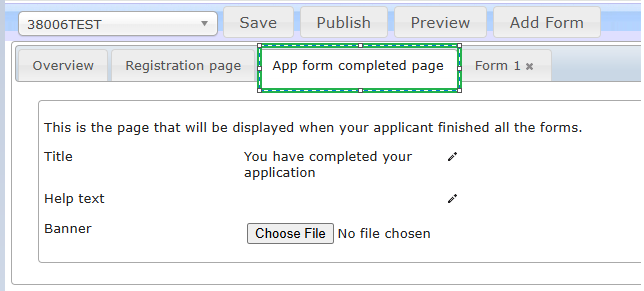
Step 4 – Select the edit pencil in the same row as title to edit the message.
Stage 5 – If you wish to add additional help text, repeat step but in line with Help text.
Stage 6 – Save and republish. If you’re unsure on how to republish, please see this FAQ.
The act of publishing an Application Form is straightforward, just save the application form and select the ‘Publish’ Button. Once the application form is published, you can use the ATS to automatically publish the form to your chosen media sites, or manually post the links yourself. However, there are some points to consider before publishing your appform.
1 – Does your application from have a unique tag? It is vital that each application form you create on your system has a unique tag. Without each individual form having its own tag, you will most certainly experience errors as the system will not know which form the applicant is completing.
2 – Has the form been thoroughly tested by the team? At AXLR8 we recommend that before an application form is published, a minimum of three people have put it through a rigorous testing procedure. To watch out for are;
- Are multi-row questions set up correctly?
- Do the answers to conditional question lead to the correct set of questions?
- Are there any grammatical errors?
3 – Which link to share on your website? At the bottom of the overview page, you’ll see two ‘Click Here’ options. The first one contains a Registration and Login Page, which will allow applicants to create a new applicant login to the system. The second link only allows applicants to continue from a previous Application. This means that they would have had to complete a stage one application form to complete the new form that you’re publishing.
Once all these steps have been completed, you will be ready to publish your new AXLR8 application form!
AXLR8 provides many options for collecting further information during employment. You can continue to update staff details when required.
The main tools which may be used, in combination or alone, are:
- AFB (AXLR8’s Application Form Builder)
- AXLR8 Vetting Module (which is for managing your BS7858 compliance) and
- the AXLR8 Staff app (also available as a web portal).
Second Application form
Once hired, you may send staff to a secondary form built using AFB . This may ask for details for payroll and the completion of the form may be set up for the applicant a condition of employment. It is sometimes called the “Job Offer Acceptance” form. That is because it contains the job contract and one or more acceptance confirmations. It may contain requests for bank details and other information you that is inappropriate at an earlier stage in the candidate journey.
In regulated industries such as Care sector, Security, Airside staffing, your Vetting procedures may also be carrying on for a period using a standard such as BS7858. In security agencies, BS7858 vetting can carry on for 12 weeks whilst the staff are working on shifts.
Staff App or Staff Portal
Your company’s AXLR8Staff App (or staff web portal) allows the addtion and up date of information by the staff member.
If some details were not collected during the employment selection process, the staff member may also add them through the App or Staff Portal. These details may include payroll details, bank account details, date of birth, rights to work information. It may be that your business needs to see originals of documents as part of your process and, in that case, the HR team can upload scans/pictures of them and sign them off online.
You can find more detail here.
What Lookup type should I use? Within the AXLR8 Staffing System, there are multiple lookup types which each have a different function. There are the following look up types: Text, Whole Number, Number, Date, Yes/No and Memo. Each manages a different type of data.
Text
This is perfect for when you want to store short worded answers, such as their preferred working location or first pet’s name for security reasons.
Whole Number
A whole number is an integer (not a decimal). 2 or 333 or 145 are examples.
Number
Is a lookup where the number can contain a digit(s) after the decimal point e.g. 11.75.
Yes/No
A Yes/No field only allows for those specific answers. If you’re creating an application form and are looking to use conditional sections (“Do you have a UK Driving Licence?”, “Do you have the right to work in the UK?, etc.) You can use these for branch logic.
Date
This does what it says on the tin. It’s a simple date picker. However, it can be customised easily within the set up of the Lookup. If it is for a Date of Birth, you can set a date range to exclude under 18s. To set the date range (As standard it’s 7 years ago and 7 years ahead). Please see here for how to change the date range.
Memo
A memo is a larger text field. Within a memo you can store more in-depth notes on the staff member. Here are some examples. It can be an answer to the question: “Why do you want to join our company?” It can also be for medical history or criminal offence details.
When creating an Application Form for the first time, it’s important to know which type of question you should use for each question. In AXLR8 Application Form Builder there are 5 types of question that you’re able to ask; Lookup, Field, File, Multi-Row and Other, depending on the data you are requesting in the applicant’s answer. Definitions of each question type are listed below.
Lookup – a lookup is a field that is personal to your business. You can create new lookups at any point by heading over to Lookup Admin.
Field – a field question is requesting data that comes as standard in every Staffing system. This will be common personal data on the staff member. Examples of Fields are; Mobile number, Address details, Title.
File – any file you would like to ask a staff member to upload i.e. image/file/document. The file type will need to be defined in order for the data to be stored in the correct place. Examples of file types include; Staff Image (this would be used for a headshot/thumbnail) , Staff Document (this could be a copy of their passport) and Proof of Address (essential for vetting).
Multi-row – a multi-row is a type of question requesting applicants to upload multiple groups of data. This may be: Next of Kin, Address History or Employment History. With multi-rows, as well as other types of Fields, you are able to set a minimum requirement. For example, you may specifically require 5 years of Employment and Address History or you require two Emergency contacts (Next of Kin). To set a required amount, you need to click on the cog which is displayed once you have inserted the question.
Other – In this section, only custom question types that have been developed for your business are displayed. These tend to contain custom formatting that can be created for you. If you would like to learn more about custom formatting, please contact your Account manager.
AXLR8 Staff app
Once you have run through all your selection procedures and wish to add an applicant to your “staff bank” for shifts, you simply find their record and
- press “Promote to staff”
or
- set the JAS (Job Application Status) to a hired value as determined by your company.
then the person becomes “Staff”.
They may never actually work for you or get paid at this stage but they will have access to the Staff Portal and they can be booked for shifts and events and be able to add and update certain details in their own staff records.
At a point in your staff acquisition and selection process, you will make a decision to offer them employment and eventually hire them. We call this process “Promote to staff”. In some AXLR8 ATS systems with a high vetting requirement, the link may also be called “Invite to Interview” or similar in companies in a regulated industry with high vetting standards. Examples include security staffin, the care sector and airports.
What happens when I promote somone to staff?
Their employee record is set up and they get their welcome, offer letter explaining any further information required for acceptance/payroll and vetting processes as well as access to the AXLR8 Staff app.
Further details on the promote to staff automation.
Collecting further details post-hiring
Some employers may decide to collect certain information of a private nature after the decision to hire.
AXLR8 provides many options for this and any continual staff details updates required. The main tools are:
- AFB (AXLR8’s Application Form Builder)
- AXLR8 Vetting Module (which is for managing your BS7858 compliance) and
- the AXLR8 Staff app (also available as a web portal)
Further details on collecting data following job offer or hired stage
A client asked how they could send a regular, recurring email out to staff to remind them to check their days, hours and pay on the AXLR8 Staff App. It was important the check was done by their brand ambassadors before the payroll run – not afterwards. Accounts department were previously receiving corrections and queries after the payroll run. That meant much more admin. If you use AXLR8 you will be familiar with the Pay Queries function in the app which already saves admin and provides an audit trail.
So they created a newsletter template in AXLR8 Newsletter Builder. It explained why it was better for everyone for the staff to check their hours and pay in the pay tab before payday each week.
Once the template was set up and the relevant staff added to a dynamic search, they set up the recurring mailing schedule. To do this, they went into the mailings tab as usual and selected a sender and the newsletter template. Then they opened the Advanced Tab. Sounds scary but it is actually full of useful options. Your options may be different to the screenshot depending on what social media publishing functions you have configured.
Then they selected the schedule options they wanted. This is shown at the bottom of the screen shot below.
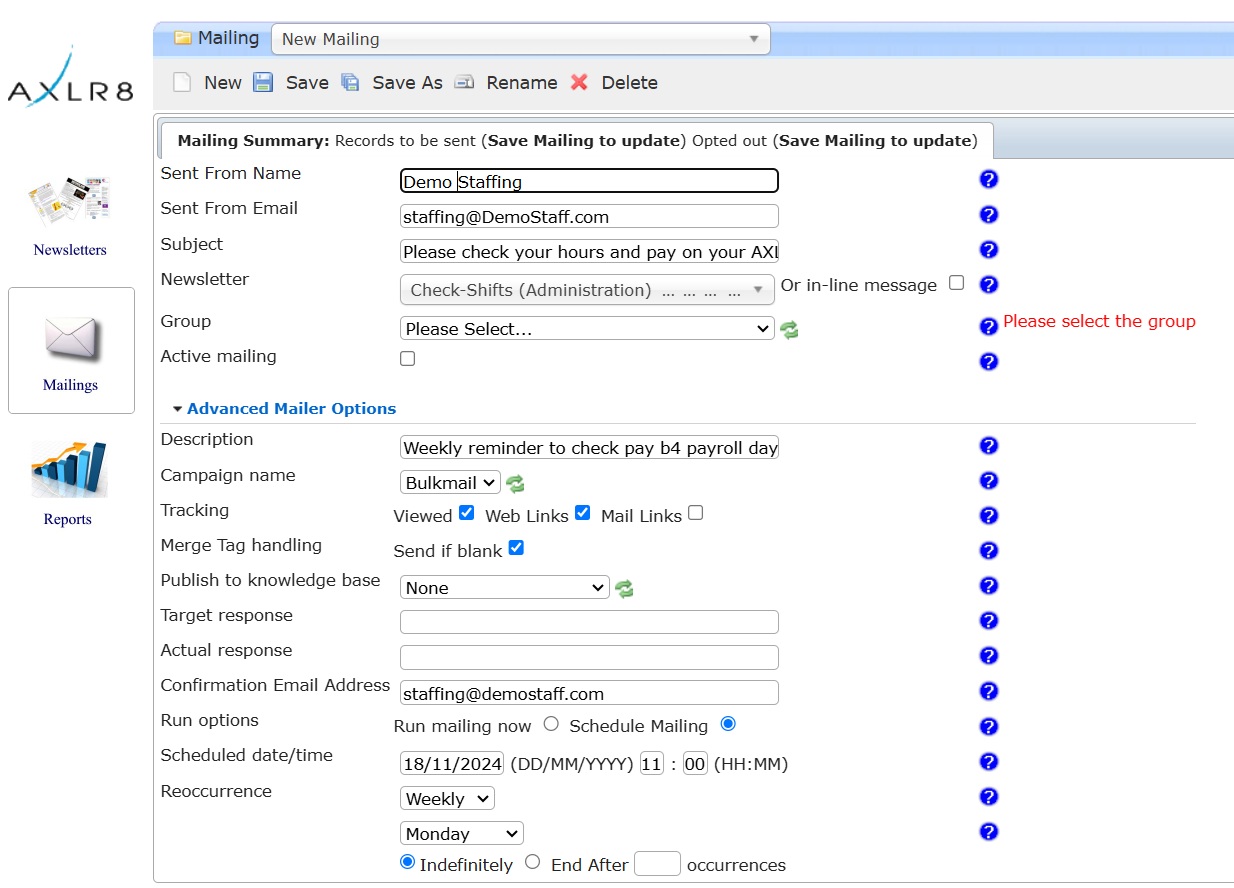
As you can see, they changed the “Run Options” from just running straight away to “Schedule Mailing”.
Then they chose “Weekly” and asked the system to send it every Monday at 11 a.m. Obviously, we then took out an PII before making this screenshot.
Other uses of repeating email templates
Other reasons to send recurring mailings include debt collection and certain marketing follow ups. Let us know if we can assist you to set these up. One of our customers used to send out a weekly mailer to local businesses with a new account form for her taxi company and an incentive. In a month, it brought her two of the largest companies in the area as clients.
Intelligent Mailings
If your mailing must go out on special events in specific conditions with specific contents, you may need to use AXLR8 Trigaware TM . In that case, please contact Support
AXLR8 provides many options for collecting further information during employment. You can continue to update staff details when required.
The main tools which may be used, in combination or alone, are:
- AFB (AXLR8’s Application Form Builder)
- AXLR8 Vetting Module (which is for managing your BS7858 compliance) and
- the AXLR8 Staff app (also available as a web portal).
Second Application form
Once hired, you may send staff to a secondary form built using AFB . This may ask for details for payroll and the completion of the form may be set up for the applicant a condition of employment. It is sometimes called the “Job Offer Acceptance” form. That is because it contains the job contract and one or more acceptance confirmations. It may contain requests for bank details and other information you that is inappropriate at an earlier stage in the candidate journey.
In regulated industries such as Care sector, Security, Airside staffing, your Vetting procedures may also be carrying on for a period using a standard such as BS7858. In security agencies, BS7858 vetting can carry on for 12 weeks whilst the staff are working on shifts.
Staff App or Staff Portal
Your company’s AXLR8Staff App (or staff web portal) allows the addtion and up date of information by the staff member.
If some details were not collected during the employment selection process, the staff member may also add them through the App or Staff Portal. These details may include payroll details, bank account details, date of birth, rights to work information. It may be that your business needs to see originals of documents as part of your process and, in that case, the HR team can upload scans/pictures of them and sign them off online.
You can find more detail here.
If you either
- click on “Promote to staff” or
- set the JAS (Job Application Status) to a hired value as determined by your company
then the person becomes “Staff”. They may never actually work for you or get paid at this stage but
- they will have access to the Staff Portal and AXLR8 Staff app and
- they can be booked for
- pre-planned vetting workshops and interviews and for
- shifts and events.
At a point in your staff acquisition and selection process, you will make a decision to offer them employment and eventually hire them. We call this process “Promote to staff”. In some AXLR8 ATS systems with a high vetting requirement, the link may also be called “Invite to Interview” or similar. The reason for this is they are required to bring a number of original documents to an interview workshop such as PoID, PoA, and much more Also, several weeks of BS7858 vetting carry on during their initial work shifts.
So, what does “Promote to Staff” actually do?
This simple click takes the contact details of the applicant and automatically does everything you need to create the User account and employee record.
- creates a user account on the system with “Staff” rights. That mean they can log in to the staff web portal and also access the “AXLR8 Staff” app on their mobile phone.
- Normally creates the next employee number and allocates it. However, in some businesses this may be done elsewhere and AXLR8 have several varietions and you can manually take a personel number form another system if you wish.
- Additionally, various pieces of data collected during their candidate journey are registered in their employee records including.
- Autocreation of a unique log in name. Normally
(perhaps with a number added if a duplicate) - Password (encrypted) used in the application. (password reset if the staff member has forgotten)
- More readable friendly name (can containg duplicates)
- Contact details such as email (for password reset) and mobile number,
- Right to work details such as passport and visa numbers, types, expiries, NI number, etc.
- Date of Birth
- Bank account details if collected already
- Default Staff portal log in
- Default chosen by your business for whether or not they can see payroll on the app.
- Autocreation of a unique log in name. Normally
Sends Welcome/Job Offer email
It normally sends out an automatic welcome letter depending upon data still to be collected from that staff member, it may also contain a set of instructions and a link to a further job acceptance form or tell them to fill in the details on their AXLR8 Staff app. Please check that yours is in your package and that its template contents have been created, approved and configured for your company.
BS7858
5 year employment history is required in BS7858 Vetting for many regulated jobs. Secuirty, airports and care are examples.
If an applicant cannot recall all the dates or employment details then they can request this from HMRC. Please note, this could take up to 14 days to arrive.
Option 1. Apply online
https://www.gov.uk/guidance/hmrc-subject-access-request
- Go to www.gov.uk
- Search for HMRC subject access request
- Tap the link that is under how to get your requests and apply for a SAR online
- Complete with full information and submit
Apply by email – Please ensure you are emailing info.sars@hmrc.gsi.gov.uk and that you are providing all the information below
- Full name (including middle names)
- DOB (DD/MM/YYYY)
- National insurance number (AA 00 00 00 A)
- Full current address (including postcode)
- Any previous addresses (if you have moved in the last five years to your current address, please provide your previous address that you lived in)
- What years you are applying for (please ensure you request a full five years from the date you are applying. If the date today is 01/02/2025, please request from 2020 until 2025)
- Reason to why you are applying, for example; you are applying for a position at Happy Town and a five-year history check is mandatory for you to begin work with us.
Option 2. Apply by phone
Call HM Revenue on 0300 200 3300, provide all your details and ask for a five year employment history letter which you will receive by post.
Candidate Journey
You can plug this into your application process. Simply use the Employment History Question type in AXLR8 AFB (Application Form Builder).
Integrated with BS7858 in the AXLR8 Vetting module?
Then the details will go straight into the BS7858 vetting section and the emails and can be used to auto launch the reference letters to obtain confirmations of the facts from previous employers.
There are many tools for doing this in AXLR8. Let us look at three examples.
Application Form
Using AXLR8 Application Form Builder (AFB) you can create conditional questions. These can be made to follow the logic shown in this flowchart.
Vetting Workshop
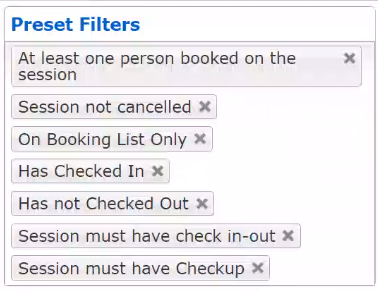
Using AXLR8 Vetting to support your BS7858 process you can collect and approve all the data you need including:
- Proof of ID
- Proof of Address
- Confirmation correspondence from 5 years employment history
- Visas and other BRP and work documents
- SIA badge checks
- Others.
The original documents s should be checked and authenticated by a qualified vetting manager
Online Checks with Rightcheck
Checking online is integrated with AXLR8 using the Rightcheck service. It works seamlessly within the AXLR8 Job Application Journey. There are more details in this article.
Feel free to contact your Support consultant if you do not find your answers in FQ or enough training material. Also, get in touch with your account manager if you have not purchased the modules listed above.
Once you have run through all your selection procedures and wish to add an applicant to your “staff bank” for shifts, you simply find their record and
- press “Promote to staff”
or
- set the JAS (Job Application Status) to a hired value as determined by your company.
then the person becomes “Staff”.
They may never actually work for you or get paid at this stage but they will have access to the Staff Portal and they can be booked for shifts and events and be able to add and update certain details in their own staff records.
At a point in your staff acquisition and selection process, you will make a decision to offer them employment and eventually hire them. We call this process “Promote to staff”. In some AXLR8 ATS systems with a high vetting requirement, the link may also be called “Invite to Interview” or similar in companies in a regulated industry with high vetting standards. Examples include security staffin, the care sector and airports.
What happens when I promote somone to staff?
Their employee record is set up and they get their welcome, offer letter explaining any further information required for acceptance/payroll and vetting processes as well as access to the AXLR8 Staff app.
Further details on the promote to staff automation.
Collecting further details post-hiring
Some employers may decide to collect certain information of a private nature after the decision to hire.
AXLR8 provides many options for this and any continual staff details updates required. The main tools are:
- AFB (AXLR8’s Application Form Builder)
- AXLR8 Vetting Module (which is for managing your BS7858 compliance) and
- the AXLR8 Staff app (also available as a web portal)
Further details on collecting data following job offer or hired stage
AXLR8 provides many options for collecting further information during employment. You can continue to update staff details when required.
The main tools which may be used, in combination or alone, are:
- AFB (AXLR8’s Application Form Builder)
- AXLR8 Vetting Module (which is for managing your BS7858 compliance) and
- the AXLR8 Staff app (also available as a web portal).
Second Application form
Once hired, you may send staff to a secondary form built using AFB . This may ask for details for payroll and the completion of the form may be set up for the applicant a condition of employment. It is sometimes called the “Job Offer Acceptance” form. That is because it contains the job contract and one or more acceptance confirmations. It may contain requests for bank details and other information you that is inappropriate at an earlier stage in the candidate journey.
In regulated industries such as Care sector, Security, Airside staffing, your Vetting procedures may also be carrying on for a period using a standard such as BS7858. In security agencies, BS7858 vetting can carry on for 12 weeks whilst the staff are working on shifts.
Staff App or Staff Portal
Your company’s AXLR8Staff App (or staff web portal) allows the addtion and up date of information by the staff member.
If some details were not collected during the employment selection process, the staff member may also add them through the App or Staff Portal. These details may include payroll details, bank account details, date of birth, rights to work information. It may be that your business needs to see originals of documents as part of your process and, in that case, the HR team can upload scans/pictures of them and sign them off online.
You can find more detail here.
If you either
- click on “Promote to staff” or
- set the JAS (Job Application Status) to a hired value as determined by your company
then the person becomes “Staff”. They may never actually work for you or get paid at this stage but
- they will have access to the Staff Portal and AXLR8 Staff app and
- they can be booked for
- pre-planned vetting workshops and interviews and for
- shifts and events.
At a point in your staff acquisition and selection process, you will make a decision to offer them employment and eventually hire them. We call this process “Promote to staff”. In some AXLR8 ATS systems with a high vetting requirement, the link may also be called “Invite to Interview” or similar. The reason for this is they are required to bring a number of original documents to an interview workshop such as PoID, PoA, and much more Also, several weeks of BS7858 vetting carry on during their initial work shifts.
So, what does “Promote to Staff” actually do?
This simple click takes the contact details of the applicant and automatically does everything you need to create the User account and employee record.
- creates a user account on the system with “Staff” rights. That mean they can log in to the staff web portal and also access the “AXLR8 Staff” app on their mobile phone.
- Normally creates the next employee number and allocates it. However, in some businesses this may be done elsewhere and AXLR8 have several varietions and you can manually take a personel number form another system if you wish.
- Additionally, various pieces of data collected during their candidate journey are registered in their employee records including.
- Autocreation of a unique log in name. Normally
(perhaps with a number added if a duplicate) - Password (encrypted) used in the application. (password reset if the staff member has forgotten)
- More readable friendly name (can containg duplicates)
- Contact details such as email (for password reset) and mobile number,
- Right to work details such as passport and visa numbers, types, expiries, NI number, etc.
- Date of Birth
- Bank account details if collected already
- Default Staff portal log in
- Default chosen by your business for whether or not they can see payroll on the app.
- Autocreation of a unique log in name. Normally
Sends Welcome/Job Offer email
It normally sends out an automatic welcome letter depending upon data still to be collected from that staff member, it may also contain a set of instructions and a link to a further job acceptance form or tell them to fill in the details on their AXLR8 Staff app. Please check that yours is in your package and that its template contents have been created, approved and configured for your company.
CallCentre
Select the person the call or task is for as up usually would and then apply these two steps to set it up and add the calendar entry. This will allow you to synchronise the action with your mobile device alarms if you have that stuff all set up.
Set your call parameters
First hit create Call or Task. Note that the two words are interchangeable although the original purpose of the Call Centre (AKA Task Centre) was for proactive customer calls. This will almost always be from a contact record – i.e. a person’s details. However, it may be from a task that is being create to follow on from a previously completed task in your Call Centre.
Save to Outlook
Then tick the “Save in Outlook” box as shown below.
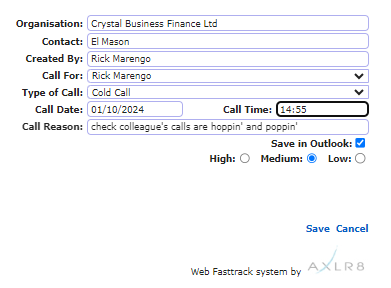
This will download an Outlook calendar file and ask you if you will allow it to be added to your calendar. This extra click is necessary for security reasons on your device. It is not secure to allow a browser to access your calendar with out your explicit permission.
Then you can open it, decide to invite others, set alarms, categorise it and do all the other things Outlook allows.
Other Calendars
It is a pretty standard file and should work with whatever your default calendar is.
Communications
Background
This blog explains why clients need to move to the “new supplier”.
What to do
You need to register for a new account with a replacement SMS messaging system. There are plenty of alternatives (including not using text messaging any more). If you choose WebexInteract, they are part of the same company and will transfer your credits across. This is better than trying to use them up before the end of November.
Whatever alternative you choose, please check the list of compatibility requirements listed below.

Step 1 Register with an SMS Supplier
WebexInteract explains, below, how to setup with Webex
- Each client should create a new account on Webex Interact at www.webexinteract.com.
- They should export any important data (contacts, opt-out lists, etc.) from their Textlocal account.
- They will then import this data into their new Webex Interact account.
- Once their new account is set up, they can notify us, and we will arrange for any remaining credits to be transferred from their Textlocal account.
If you move to WebexInteract, you can transfer over your text credits from your TXTLocal account. (If you do not move to TextLocal they offer cash back which will buy you around half the credits you had.) This article, toether with their help text, explains how to creat senders on their new portal.
Step 2 Request AXLR8 to add your new SMS supplier
Contact AXLR8 Support with your chosen supplier and we will connect it up so it sends texts on your behalf.
If you use an alternative to WebexInteract, you will need to be sure it ticks the following three boxes in order for it to work.
Compatability Requirements for any AXLR8 SMS Service
- Dedicated telephone number for sending. Also, you may need the ability to deal with replies to text messages.
- Email2SMS facility whereby a message can be sent from you to
@ - Supports a protocol compatible with AXLR8.
You will also need AXLR8’s SMS Managed Service.
Any questions? Please report any problems you encounter to support@axlr8.com or call up on 01344 776500. We are happy to invest time with you working through any issues that arise up until 23rd November. After that, we will help as we can as the Cisco imposed deadline (30th November) will be close. See this FAQ if you need to pretest your new WebexInteract account technical readiness for AXLR8’s email2SMS
Email to SMS goal
As the name suggests, an email to sms conversion service sends texts. You set it up to receive your email containing:
- the mobile number of the recipient
- and the message you want to send.
The service then converts it to an SMS message (i.e. text message) and the recipient recieves it on their phone.
Here is how to set this up with WebexInteract.
Their portal is brand new and rather different from the portal provided by the other in-house Cisco provider. (Textlocal is also owned by Cisco but the service is being consolidated into WebexInteract.)
The portal is to be found here: www.webexinteract.com.
Open an account
You will be asked for an email which will also be your user name for their portal and you must create a password. You will also have to deal with a validation email so that Cisco can be sure it is a real email address. once that is done you have configured your “default email” e.g. james@mycompany.com
Adding a Sender
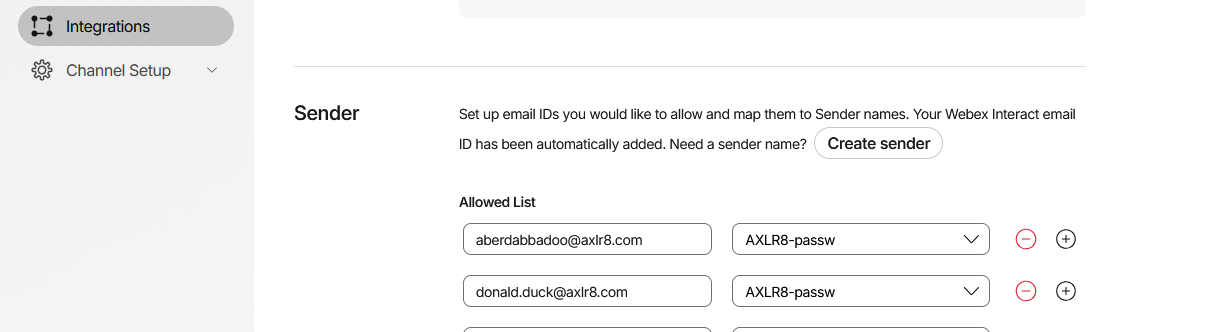
This is a confusing word as it gives teh impression you are setting up an authorised email to send. However, it is actually what the recipient sees as a sender.
If you do not have a dedicated number (see below), you must mask the shared sending number provided by the service so that people cannot reply. This is on the first page together with rules for the characters you can use and up to 11 characters (like a phone number has 11 digits). For example, (see screenshot below) AXLR8 use “AXLR8-passw” for MFA.
You must allow a day for approval of this code by CISCO. It is a manual approval (so somone does not choose, say, “NATWEST” ro “BARCLAYS”. In general, you should allow a couple of days for various checking and approval processes.
You should then be able to get a few credits – maybe 10 at 3.9p each (£0.39).
All this must be done before you are able to send tests.
Allowed List
This refers to the list of email ddresses allowed to send email2text.
However, we cannot switch your AXLR8 system (see last section) over to WebexInteract till you add all your Allowed Senders (email addresses permitted by you to send SMS messages).
If you need other people to be authorised to send texts on your behalf, you go to left hand side menu -> Integrations -> Email to SMS

Scroll down to Sender and add to the Allowed List. Please note that the ones in the list below are not real examples so don’t bother trying to use them!
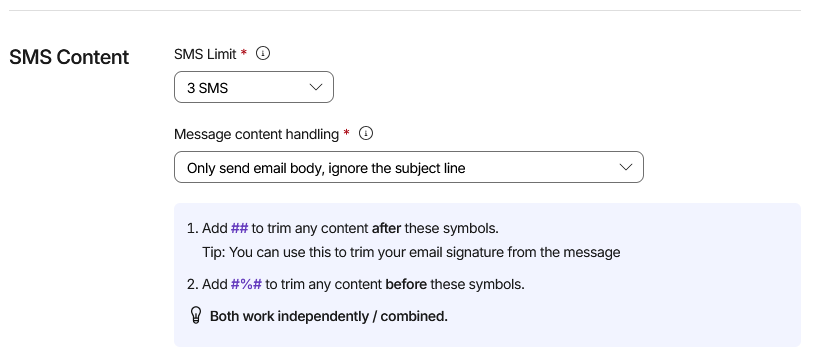
The default text length limit setting is one unit (160 char). You could keep it there or add units. Make sure you get the next settings right if you use emails to sms from Outlook as you may send out loads of units because it added your email signature (or even a whole email trail). Putting ## on the end of the text you want to send from your email may help this.
Testing your first email2SMS
To test your email2SMS send from an authorised Sender on your allowed list. Send it to mobiletelephonenumber@e2sms.webexinteract.com. If it does not arrive and the delivery failure email does not help you solve the problem, please send the delivery error message to WebexInteract Support department or use the Support Chat function.
Teammates
“Teammates” in WebexInteract parlance are co-administrators. Thus, you can have more than one person helping you with the set up and management of your account. They must be unique, emails and will need to pass a validation process. A person does not have to be a Teammate to send emails. That permission is granted in the “Allowed List” mentioned above.
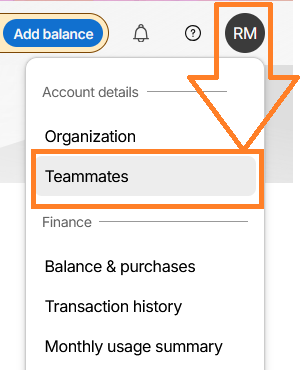
Want to set up additional people who are able to access the portal as well so you can delegate management of the process? To do this just find the Teammates item in the Account menu at the top.
WebexInteract have support facilites and documentation on the site to help you. We have been able to help some clients but are out of time except for chargeable work, now.
Dedicated Number
If you buy a dedicated number, that will allow you to send and receive SMS messages in and out of your user email acccount as you can with the AXLR8 scheme now.
AXLR8 Changes
When you have set up your WebexInteract system, we can then change the required settings in AXLR8 to your database. We need up to a few days to test and check this. Your WebexInteract system settings must be complete by midnight on 23rd November as we have to enter the new serice into your AXLR8 server and Cisco need to transfer your text credits across. Cisco have rejected our requests to extend the time limit of 30th November.
We can only do this once at no charge. If we make the AXLR8 changes and then have to be change your database back because WebexInteract is not set up correctly, then we may need to charge a small fee for setting the system back and reseting it to WebexInteract when you have completed the setup steps above correctly.
Need Help to set up WebexInteract?
Don’t for get to ask for your present credits on TextLocal to be moved over. Make sure you count the credits before your transfer and check them afterwards to ensure you have the number of credits you bought and not the monetary value which is about half as Cisco have doubled the price.
If you do not have the resources internally to accomplish this task in time, AXLR8 have a package at £550 plus VAT to if you would like us to do it for you.
CRM
Select the person the call or task is for as up usually would and then apply these two steps to set it up and add the calendar entry. This will allow you to synchronise the action with your mobile device alarms if you have that stuff all set up.
Set your call parameters
First hit create Call or Task. Note that the two words are interchangeable although the original purpose of the Call Centre (AKA Task Centre) was for proactive customer calls. This will almost always be from a contact record – i.e. a person’s details. However, it may be from a task that is being create to follow on from a previously completed task in your Call Centre.
Save to Outlook
Then tick the “Save in Outlook” box as shown below.
This will download an Outlook calendar file and ask you if you will allow it to be added to your calendar. This extra click is necessary for security reasons on your device. It is not secure to allow a browser to access your calendar with out your explicit permission.
Then you can open it, decide to invite others, set alarms, categorise it and do all the other things Outlook allows.
Other Calendars
It is a pretty standard file and should work with whatever your default calendar is.
Renaming an organisation is a two click process within the AXLR8 system. You firstly need to go to the organisation that you’re wishing to change.
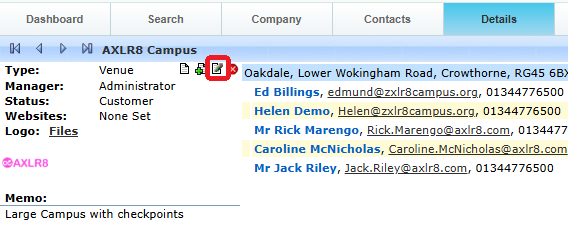
Once within this screen you will need to click on the edit page icon at the top of the screen. (Please see screenshot below)
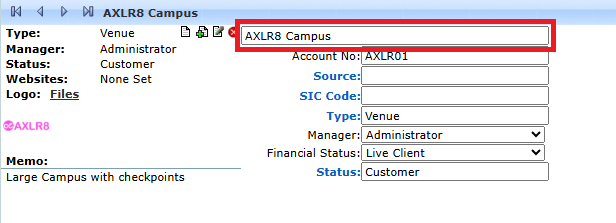
Once in this page you will just need to overwrite the organisation field, which is located at the top and then click ‘Save’ which is in the bottom right hand corner of the screen.
Customer Notes
Select the person the call or task is for as up usually would and then apply these two steps to set it up and add the calendar entry. This will allow you to synchronise the action with your mobile device alarms if you have that stuff all set up.
Set your call parameters
First hit create Call or Task. Note that the two words are interchangeable although the original purpose of the Call Centre (AKA Task Centre) was for proactive customer calls. This will almost always be from a contact record – i.e. a person’s details. However, it may be from a task that is being create to follow on from a previously completed task in your Call Centre.
Save to Outlook
Then tick the “Save in Outlook” box as shown below.
This will download an Outlook calendar file and ask you if you will allow it to be added to your calendar. This extra click is necessary for security reasons on your device. It is not secure to allow a browser to access your calendar with out your explicit permission.
Then you can open it, decide to invite others, set alarms, categorise it and do all the other things Outlook allows.
Other Calendars
It is a pretty standard file and should work with whatever your default calendar is.
Documentation and Training
Sometimes YouTube and other video on demand suppliers reduce the quality of videos you watch. This is to optimise them for bandwidth. If you are watching a comedy show or swimming training, quite a low image quailty is fine. If you are looking at a training session with screenshots of numbers and other data and in tables, the text can become unreadable at low image resolutions.
So, how can we improve that?
Adjust YouTube AXLR8 Training resolution settings
In theis screenshot below, there is a training video about setting up a roster and all the invoice and payroll data. You cannot read the numbers and letters due to the low (360p) default setting. Just go to the bottom right and A. click the Settings “cog”. This is shown in the screenshot below.
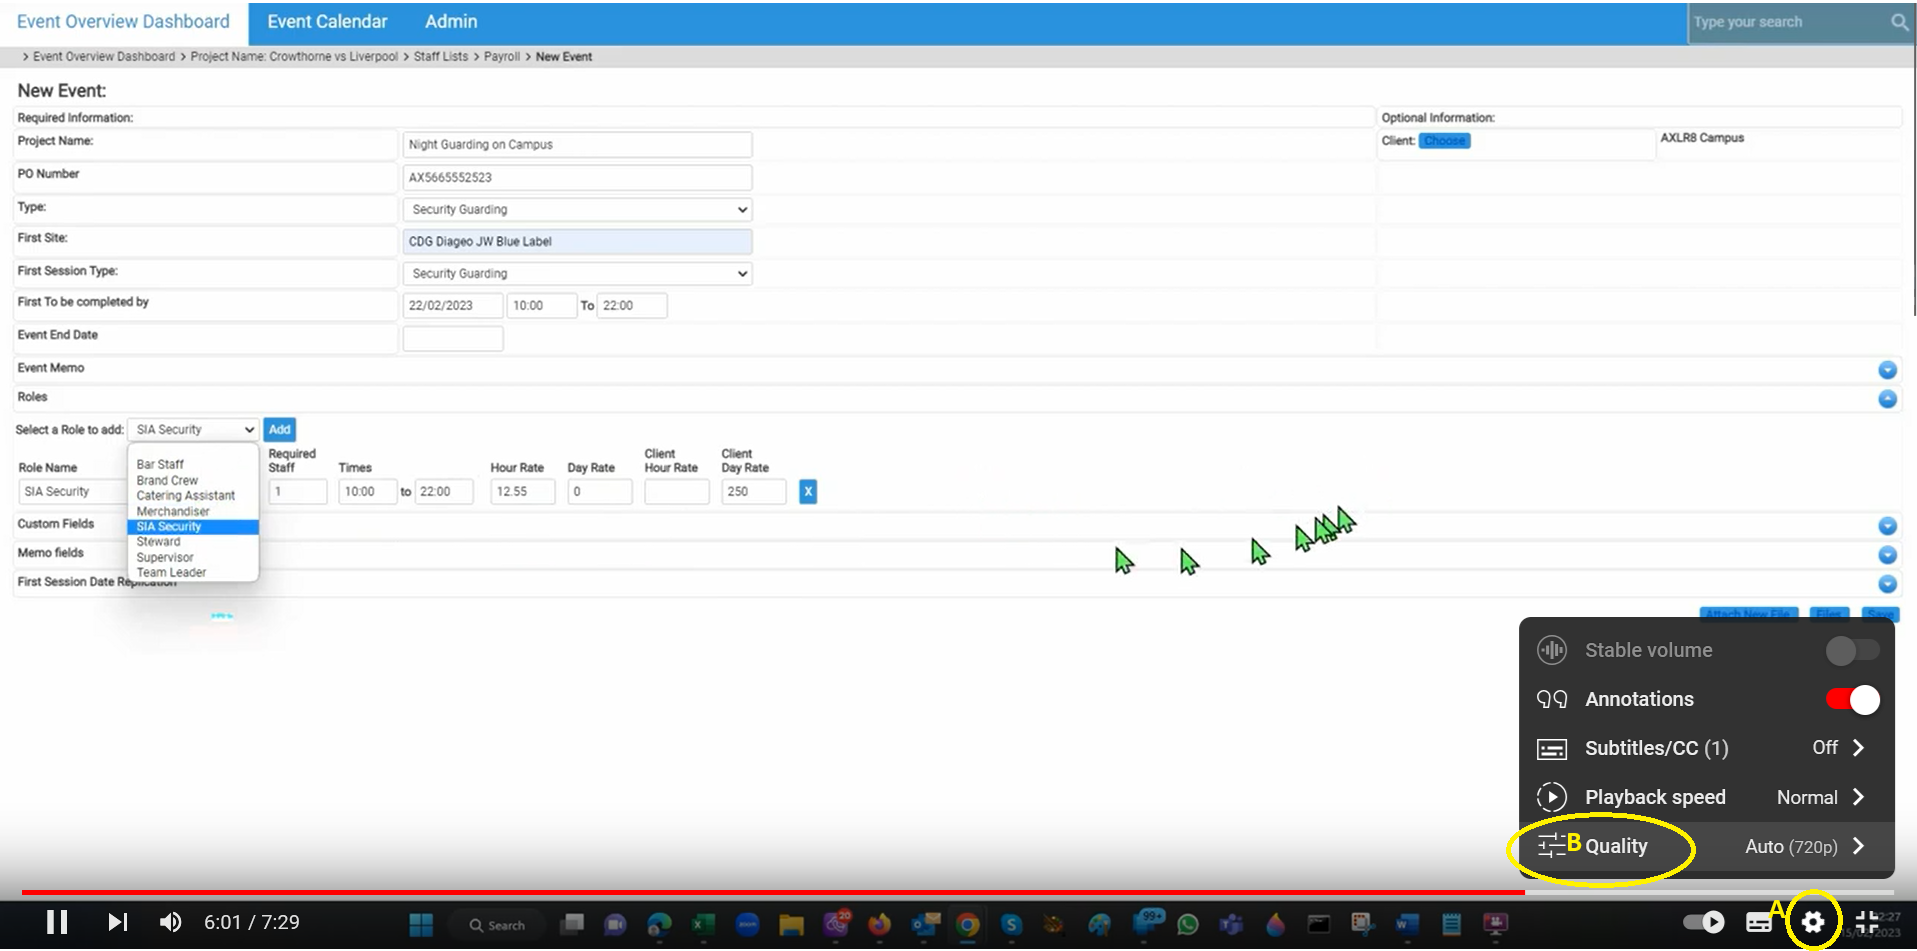
Then B. change from 30p up to 1080p and you will get a higher resolution video as shown below.
Here is the short answer. Every AXLR8 system is customised.
That means yours may differ from standard AXLR8 documentation and training videos. Your business is successful because you do things better than your competitors!
Every AXLR8 client can choose to change literally thousands of parameters. That means AXLR8 clients have all the benefits of a standard off-the-shelf (OTS) SAAS system (low cost and high functionality and reliability from years of customer feedback). In addition, AXLR8 clients can customise the system to their needs. It is a “COTS” (customisable off-the-shelf) system – the best of all worlds.
Customisation
A list of customisable items includes.
- Screens
- Colours
- reports Application forms
- Newsletter Templates
- Automatic email templates
- Document templates
- Labels
- Profiling data
- User credentials
- Roles
- ATS dashboards
- Client Portals
- Staff Portals
- Expenses categories, limits
- Lines of Business
- Quotation templates
- Event/Project templates
- Shift templates and status values
- Client categories
- Pay rates
- Staff Status Values
- Job Application Stage values
- Invoice rates
- Products
- Assets categories
- Test types
- Task types and results metrics
- Questionnaires
- ……and many more which you will learn about in the Super User trainings.
Here is an example. You can customise your company’s AXLR8 Staff app with approximately 2000 parameters. Your Super Users can change the app on-the-fly. Experienced AXLR8 support consultants can help. You can relabel the screens if your business calls an Event a Project. It could be (Projet if you are French or Projekt in German), Job, Activation or Contract. If you want pay rates or expenses over a certain amount to go red in reports, no problem. You can change your staff terms and conditions and record who has accepted them. You can update some instructions or labels on the app. This might be necessary if some staff were confused by the health and safety policy.
AXLR8 help you set up the new system inclusing customisation work. This example is for just the ATS part of the system. AXLR8 help you change the system as your business develops.
Your business is successful because it is different
You can change the AXLR8 system to suit your business requirements from the start. That will immediately improve productivity and drive the business forward. Even better, your business will evolve. Your AXLR8 system will be responsive. It will support the changes you need in business goals, processes and KPIs.
You will not expect the manuals to match those changed details on your system any more. That difference is a small price to pay for a system which can work with your business requirements. It neeed never be the other way round!
Dropdown Menu Admin
Adding a new staff type, category or “contact Status” is done in Dropdowns Admin in the Admin menu. This facility is only available to users with Systems Admin rights. You enter Drop Downs Admin and look for “Contact Status”. This is a single category you put a member of staff into. Here is an example.
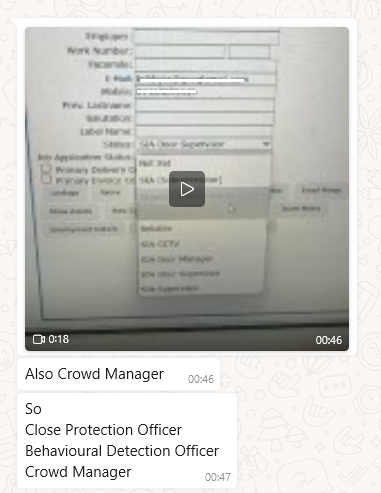
A security company wanted to add the following to their list of categories.
- Close Protection Officer
- Behavioural Detection Officer
- Crowd Manager
Below is the video message sent over by a client asking for the above which makes a good real life example.
To accomplish this in the Contact Status Drop downs Admin area, just click new and add the name of your new category.
This is shown in the screenshot below.
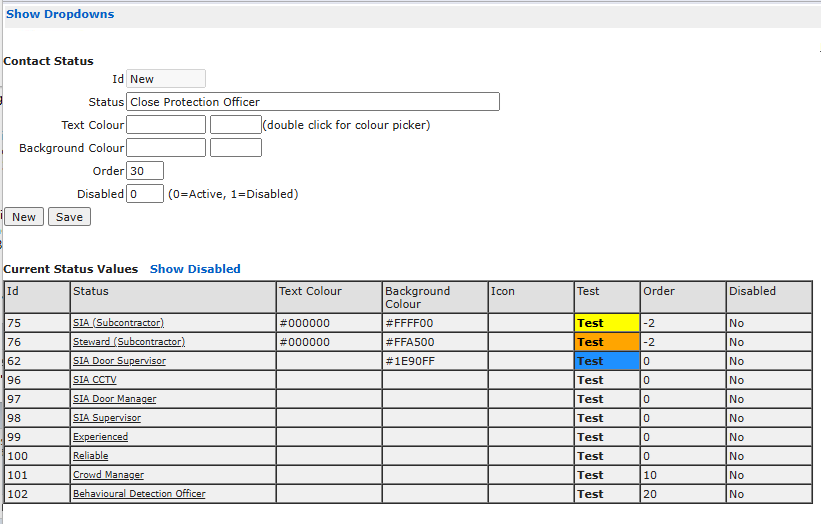
- Click “New”
- Add the status (in this case “Close Protection Officer”)
- Choose a back ground and foreground colour if you wish them to be easily distinguished in lists
- Add an order for hem to appear in the drop down menu list of categories (Contact Status) for staff
- Click Save
That’s it really!
Notice also that you can “Disable” Dropdown Menu Items if you wish. Then they will no longer appear in that drop down menu. However, staff who had the disable categorisation before will still have it now. You can leave them that way or you have the option to update them to one of the options in your new list of valid categories.
Other important points are to understand the difference between Contact Status (this parameter which is a single category to put staff into) and JAS or Job Application Status. Contact Status would normally be something like Team leader, Experienced, newbie, unreliable etc. It is also important not to use this list with care for job types where, say, a qualification might expire. SIA Door Manager is an example above. Don’t just choose someone who is categorised as an SIA Door Manager. You must make sure that any shift requiring that SIA Certificate is set up to demand people with that badge. Then when you search for staff not all people in the category will necessarily be able to work all the shifts. The reason will be that the system will look for qualified staff an be aware that a person’s badge runs out half way through the week and allow them on no more bookings. Hopefully, this will be rare. The system should have warned you many months before that the certificate was coming up for expiry
The latter (JAS), as its name suggests, is to mark candidates and staff through the lifecycle of employment. For example, applied, interviewed, offered, rejected, current staff, and then ( on termination of employment) would re-employ and would not re-employ.
Files and Documents
First Adjust your Chrome settings to choose your preference.
A. Go to Settings from the top RHS menu in Chrome. Settings is near the ottom of that menu.
B. Choose “Privacy and Security”
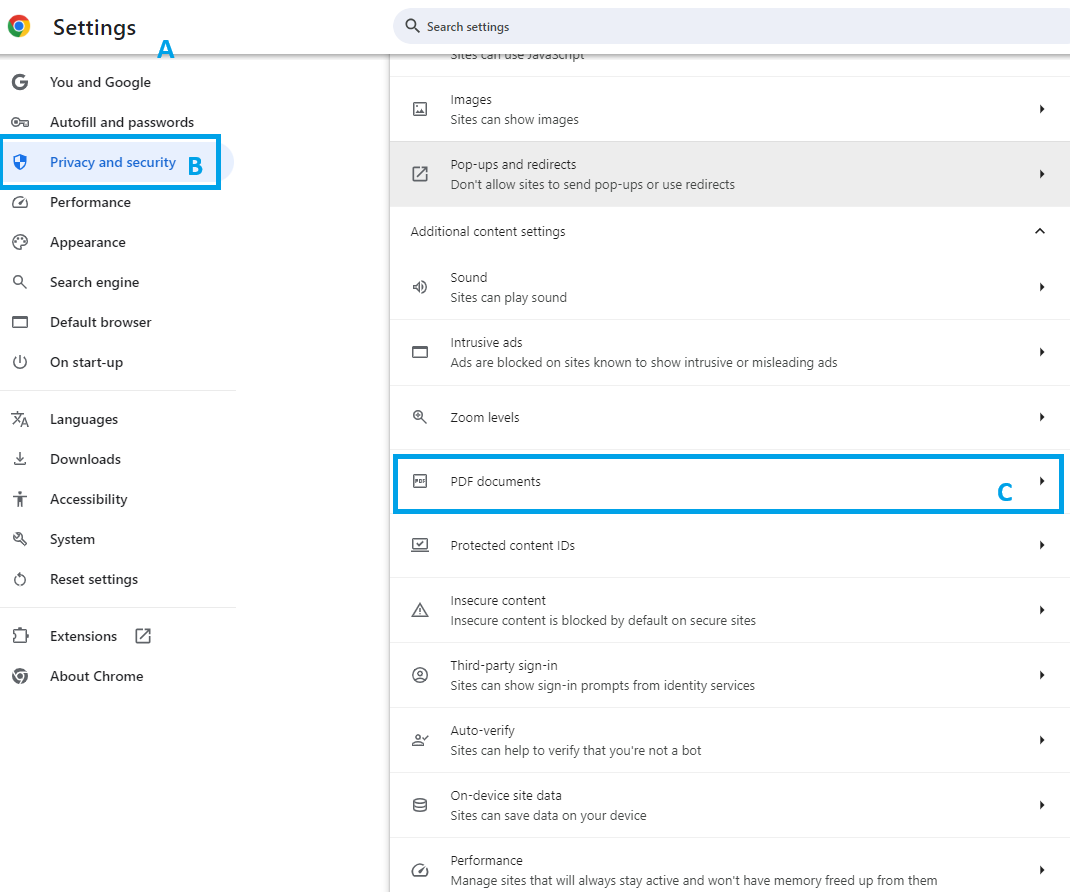
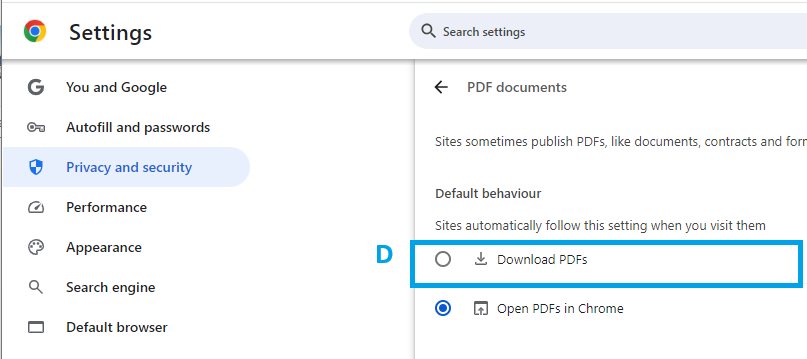
C. Choose PDFs
D. Set Downlaod as the action you require as default
Make Adobe Acrobat your default PDF application
It probably already is. However, if not, this is achieved by making Adobe your default app for PDF files (see this article on how to do it for Outlook and mail messages and apply the same principle).
Logging in
To reactivate a disabled login, you must be a Super User. What is an AXLR8 SuperUser? Read more here.
Step 1 – Go to the ‘Admin Menu’ on the left-hand menu.
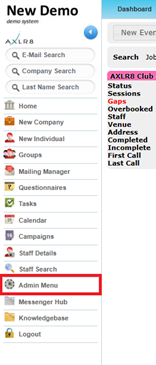
Step 2 – Select ‘User Admin’
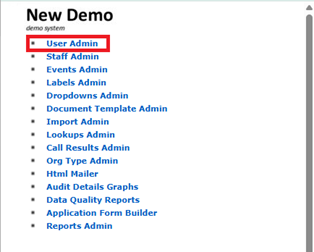
Step 3 – From the ‘Disabled’ dropdown list search for the staff member you need to reactivate.
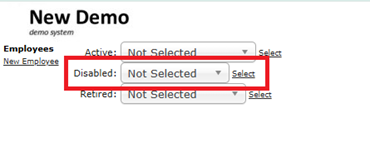
Step 4 – Click the Activate button
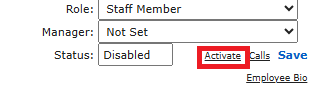
Once the Staff Member/Admin Member has been reactivated, they will be able to log back into the system.
Lone Worker
Step one is to specify your requirements. Are you just looking for night guard check ins and outs (CICO) and proof or attendance? Do you need Welfare Checks for Lone Workers. If so, do you need hourly or half hourly checks? AXLR8 will provide a test portal so you can look at configurable options.
Some Example AXLR8 Control Room Configurable Options
Most of these take a moment to toggle on and off.
- Must staff confirm their shifts before the day?
- Alerts time tolerance (2 minutes before shift start or on shift start or 1 minute after shift start)?
- Should that staff member’s record show red or should it send a text to them.
- Should it text a business manager or even a subcontractor owner/manager if you are using third parties to deliver some of your contracts?
- All shifts need CICO or just some?
- Geofencing?
- Do all shifts need CICO or are there staff present from the client to do manual checks during most day shifts?
- Obviously, you need to have some data from staff or at least test data from your pilot group to be able to do a live test.
- Need a page for online Escalation procedures?
- Do some staff not have control of the screen to scroll and click such that they must only see alert conditions?
- Do some sites use AXLR8 Checkpoints and others use geo location?
- Must pictures also be uploaded with Check ins/outs and welfare checks?
- How frequent should the screen refreshes be?
- What contact data does your escalation procedure require to be presented: Manager contacts, Staff mobile number, site number, client management?
- How do you want to process incident logs?
- What is your policy when a staff member cannot use a mobile and manual CICO and welfare calls to a land line may be required on some sites?
Your AXLR8 consultant will work through these with you.
Allocating a Control Room Dashboard page
The AXLR8 Control Room Portal is allocated to one or more user accounts. They could be managers sitting at home, banks of agents in a physical control room or someone out and about checking up with a mobile device. Other reports may be created so that a manager can drill down into more information if required.
Configuration and performance
There are several competing priorities in any security system and so we have built in the flexibility to customise your reports and alerts together with the performance necessary for frequent refresh of field data. Thus, we have built in options including the ones you see set up for a client below.
Of course this is all in addition to GDPR compliance, security and all the other risk management and compliance matters we need to balance in business.
Please call AXLR8 Support for a demonstration but please consider the above factors so we can show you something that fits your business.
Pinpointing CICO locations within AXLR8 is vital. Setting an exact site within AXLR8 has never been easier. Our Maps tool allows you to pinpoint a Check In Point to an exact location using our GeoFencing module.
Step 1 – Search for the customer/site that you are looking to set the location for. This can be done within the multi-search, report or the dashboard itself.
Step 2 – If the customer has multiple sites attached. Select the site you are looking to set the CICO location for.
Step 3 – Now you’re on the site you wish to pinpoint the location for, select ‘Map’.

Step 4 – expand the section and use the ‘+’ and ‘-‘ to zoom in and out to find the landmark you’re looking to set the check in point for.
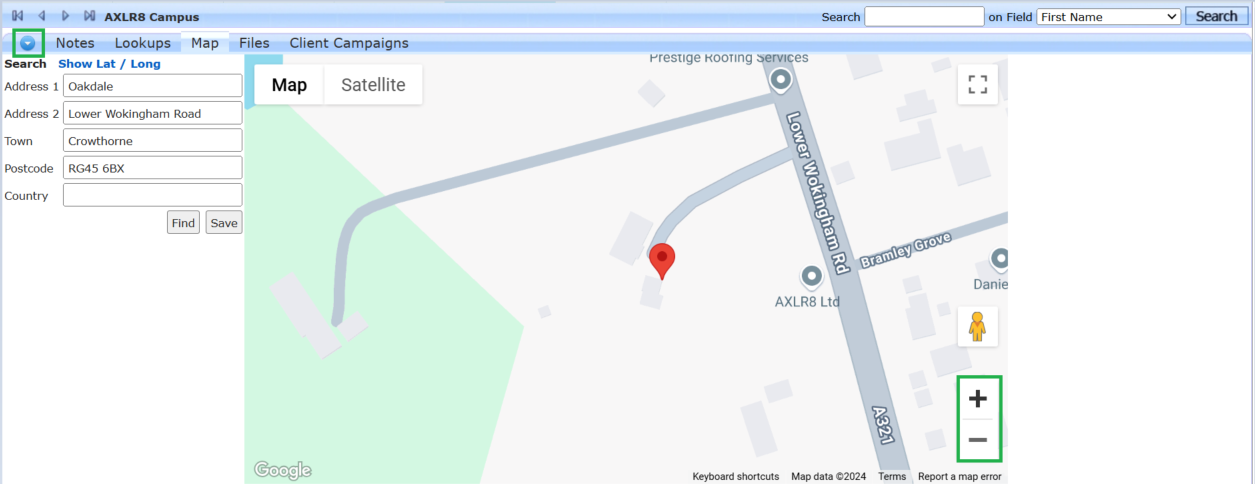
Step 5 – Drag the pin to the location you would like to set as the check in location.
Step 6 – Save the location.
AXLR8 can set the Geo-Fence to your requirements, please feel free to check these with your account manager if you’re unsure, before saving.
- Open the what 3 words app and enter the 3 words here in order to find the exact Latitude and Longitude.
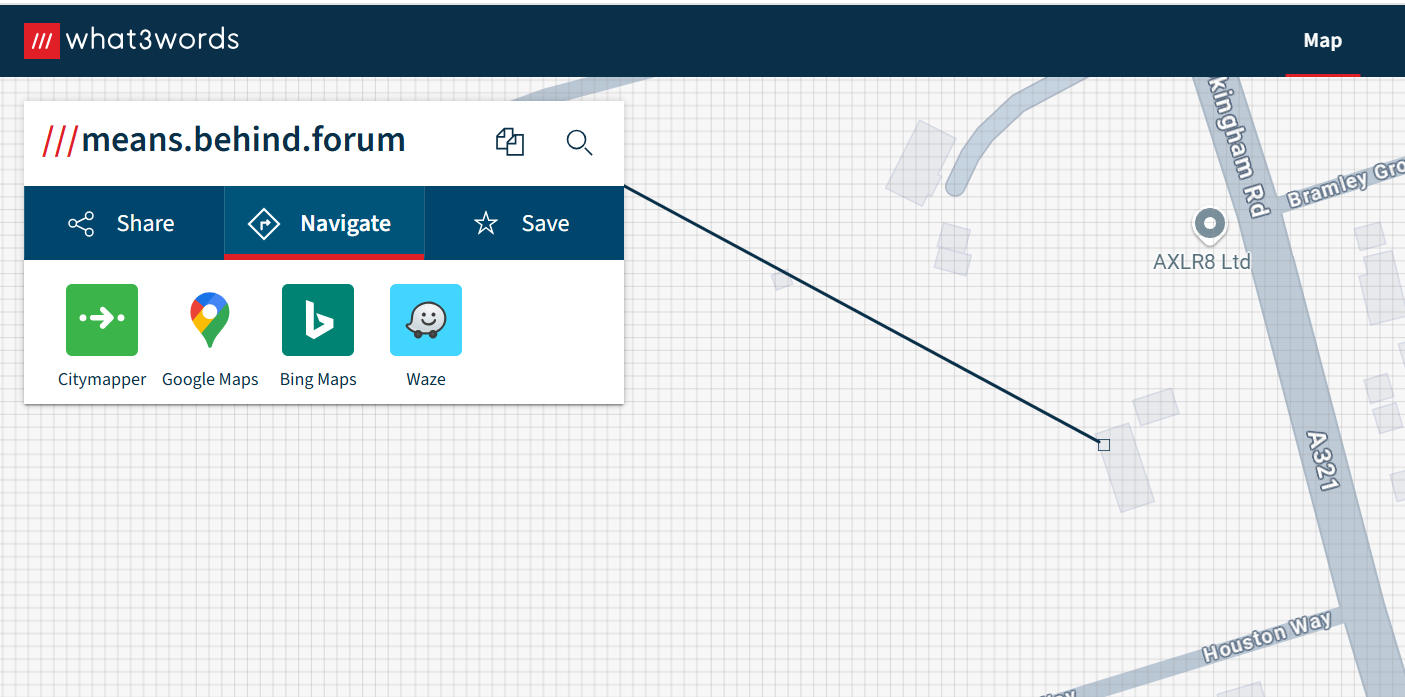
- Click ‘google maps’ Link
- In the URL you will get the Latitude and Longitude data

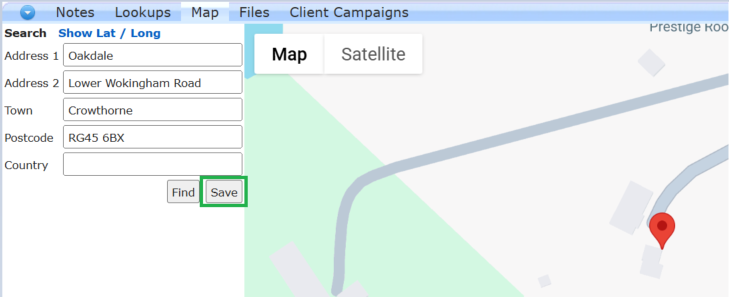
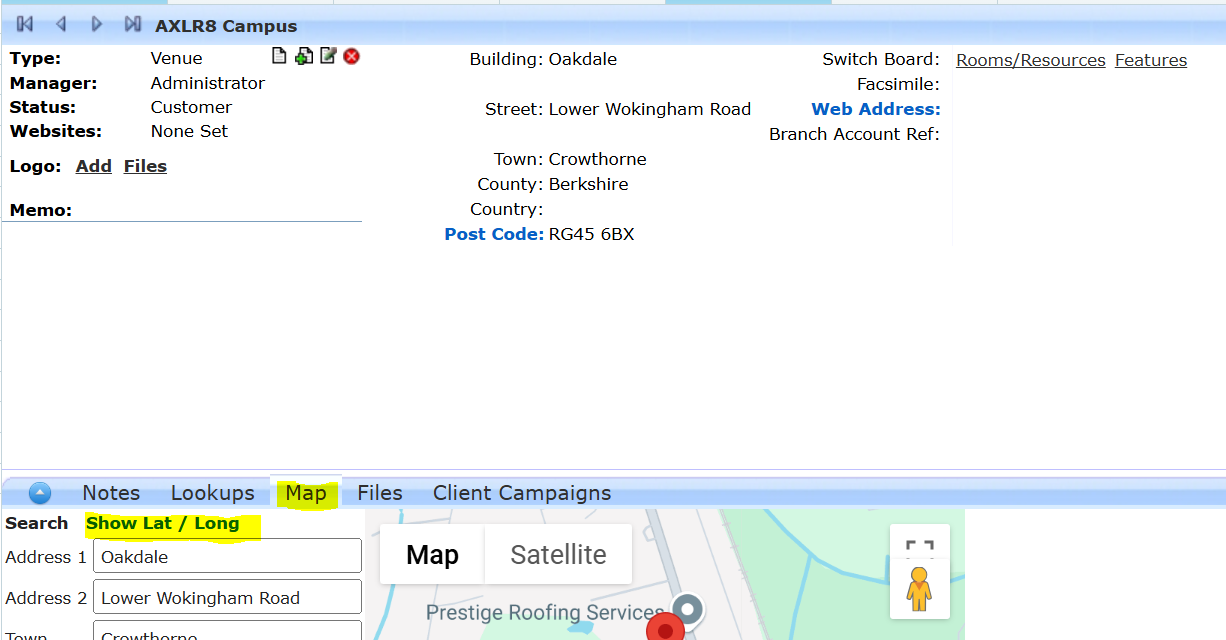
- Open the venue in AXLR8, click on the address line.

- Open the maps tab and click on ‘show lat/long’.
- Update the lat / long figures to match the google maps

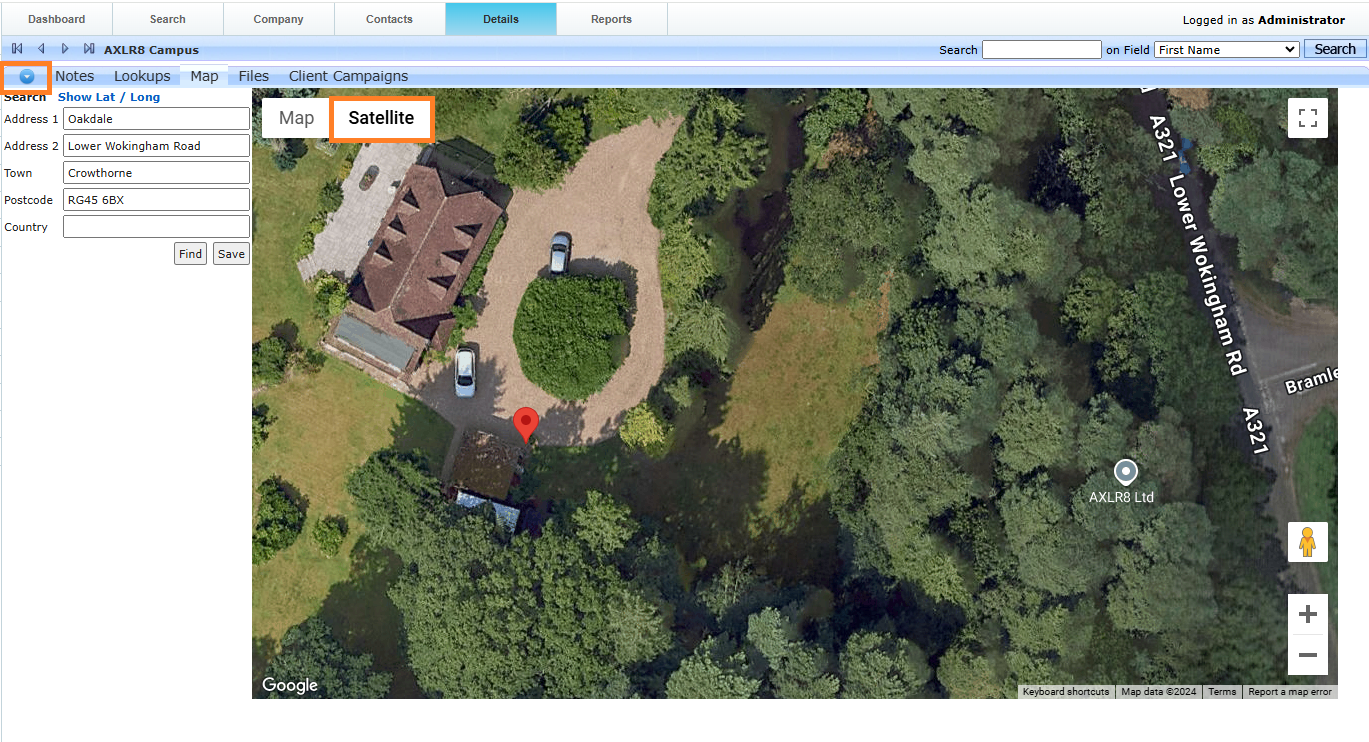
- Zoom in to check it is correct. The common issue with What 3 Words is that one word slightly wrong could be a continent away from the right place! Sometimes toggling to “Satellite” view can be very helpful to ensure accuracy. Check with the client so the exact spot makes sense!
- You may find it easier to maximise the Map view using the button shown in the Satellite screenshot below.
- Save
Mailing Manager
Obviously the answer is YES of course. If you are short of time and need to get some words out before close of play, you can skip the Newsletter Builder part of Mailing Manager altogether.
Click the Mailings tab of the Mailing Manager. Enter the friendly name of the sender, email of sender, and email subject line. Tick the option to send an “in-line message” and the text panel will open, as in screenshot below.
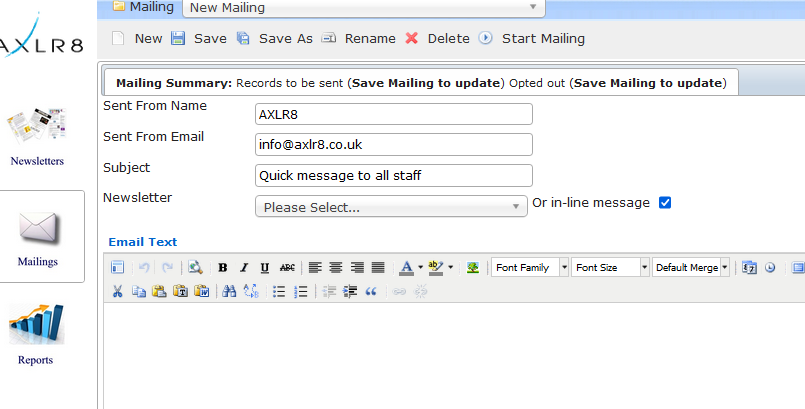
Type your message in the panel. You still have access to most of the formatting icons as in the full Newsletter Builder, so can add colour, images etc. should you want to do so.
Lastly, from the “Group” dropdown list, select the distribution list that you wish to send to, and click “Active Mailing”. Save the mailing on the top menu, and click “Start Mailing”.
This is a much quicker method of sending messages out when design and formatting is less important than the message itself.
Yes, great idea to make the recipient think that they are not part of a huge batch of emails being sent out, and to include pertinent details for their own company.
The dropdown field on the toolbar, initially set to “Default Merge” is used for this purpose. Within the dropdown you will see various options for inclusion.

Create your mailer, inserting values from the list as appropriate:
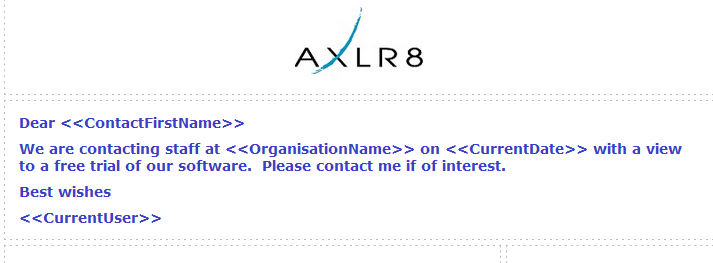
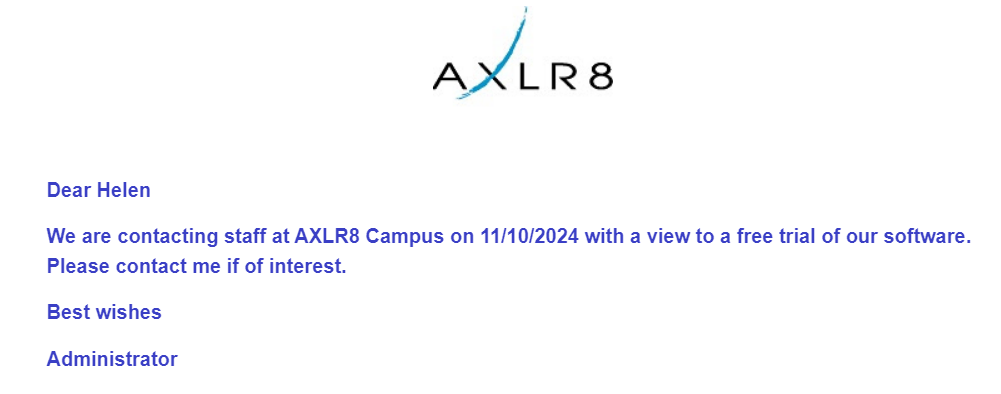
When saved and sent out, values for each recipient will be substituted from the values in the database.
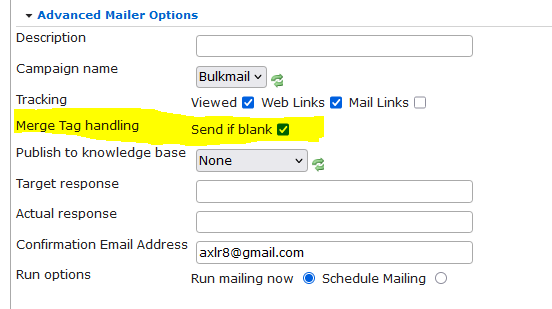
Word of Warning! If there is no ContactFirstName or any other data missing for any of the recipients, the mailing will not send and errors will be highlighted on the Completed Mailing report, as below:

You may want it to not send if there is data missing – for example, if sending a quote and there is no price set for a particular client. If you would like it to send regardless, then ensure that the “Merge Tag Handling” checkbox is ticked when sending.
Be aware of the impact though, that if there is no ContactFirstName in the database for one of the recipents, a space will be substituted instead. As a result, many of our clients will say “Hi” instead of “Dear”, thus minimising the impact of poor data!
The “Default Merge” dropdown is a mere sample of the most popular fields to be incorporated into a mailer. AXLR8 can provide tags for most fields in the database, so if the field you would like to merge in is not shown in the list, please contact our Helpdesk.
Yes, and more importantly you can see who has clicked the links you have embedded in your mailer – so important to include these!
We usually suggest leaving it 24 hours after sending before reviewing the results of a mailing as recipients do not invariably open an email immediately it hits their inbox.
Go to Reports within the Mailing Manager. Click the “Completed Mailings” tab at the top. Then click the icon to the left of the mailer in question. Results of that mailing are displayed as in example below. Click “Export” to download all the information to a .csv file.
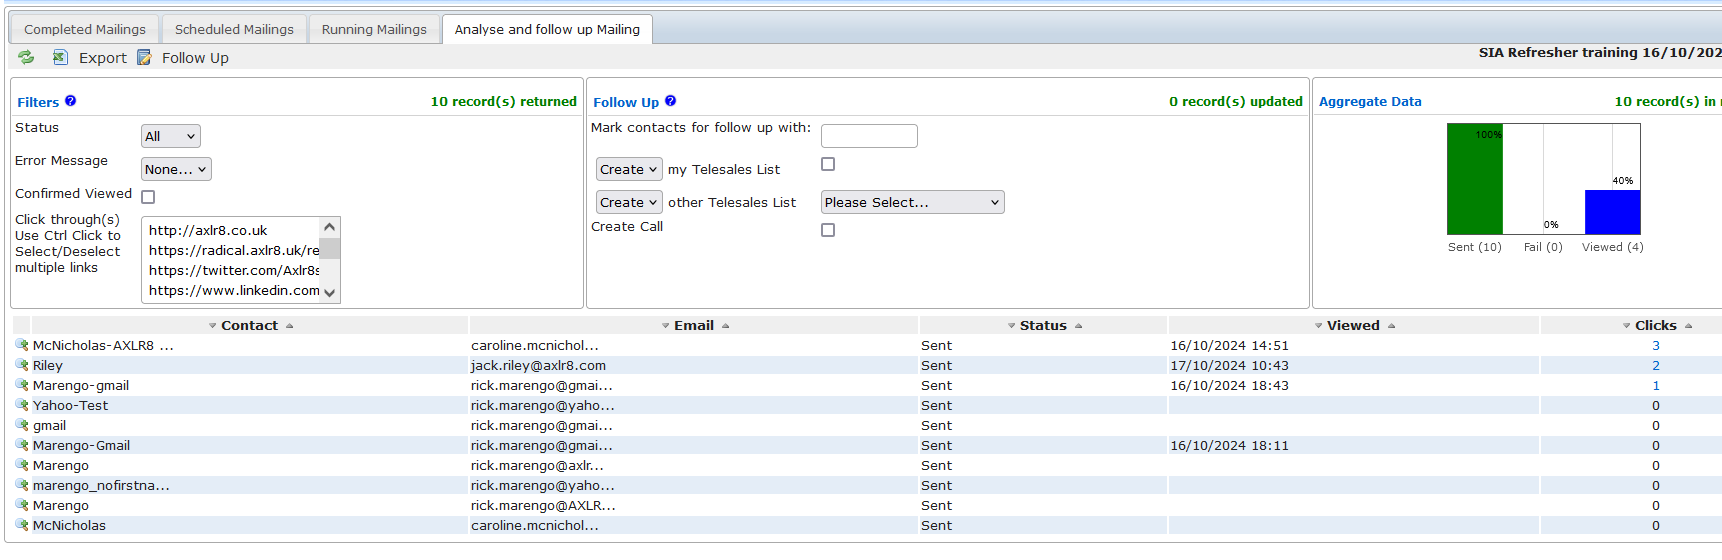
In the 2nd column, the emails are displayed for those that were sent to. In the “Viewed” column, you can see the date and time that the emails were open. This only registers if the email was actually opened and images downloaded, so it is possible for your email to have been read in the Preview pane within Outlook, but not have a date / time in this column.
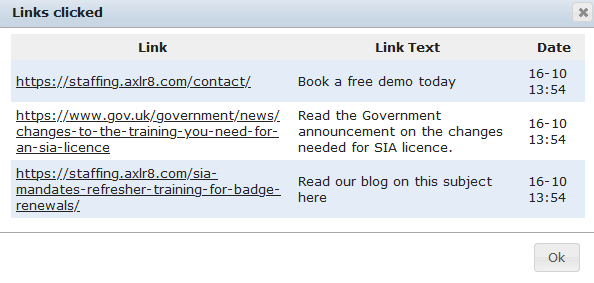
The final column displays the number of links within the email that have been clicked. The recipient at the top of the list has clicked through to 3 pages. Click the “3” and details of the links clicked are shown, as below.
Especially useful if you have sent out a large mailing, you can display a list of all recipients that have clicked a specific link. For example, if you wanted to see all those that had clicked through to read your blog article on the subject, click on the appropriate link within the Filters panel, and then on the “Refresh” link in the top left corner.
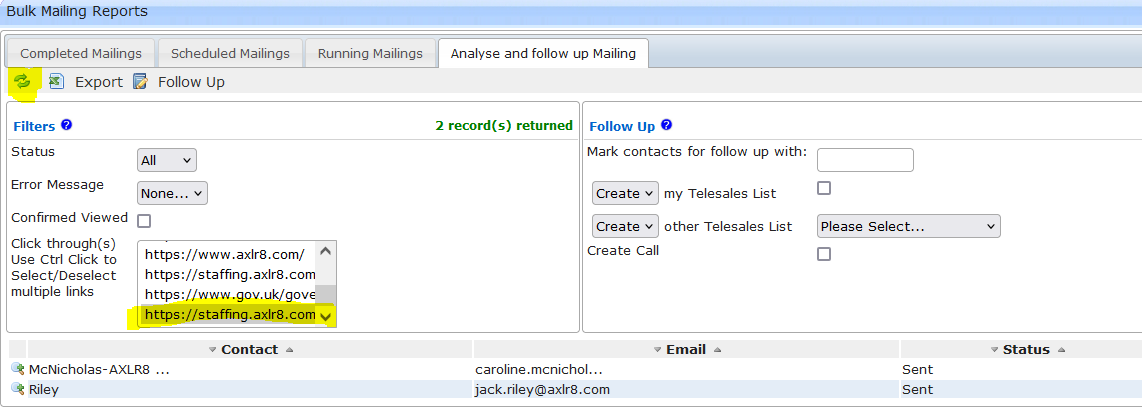
You can see that 2 people have clicked this link from the report. If you have many links to scroll through, pause and mouse over each link, and you will see more details of the link to help identify which is the one needed.
It is possible to flag those recipients that have viewed the mailing and / or clicked a specific link within the database, for follow up with a further newsletter or by telesales. This is covered by another FAQ.
Yes, and this a great idea for a marketing email!
Develop the mailer and save it, making sure the content remains pertinent for all times of the year.
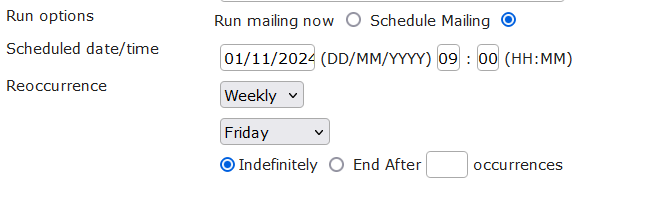
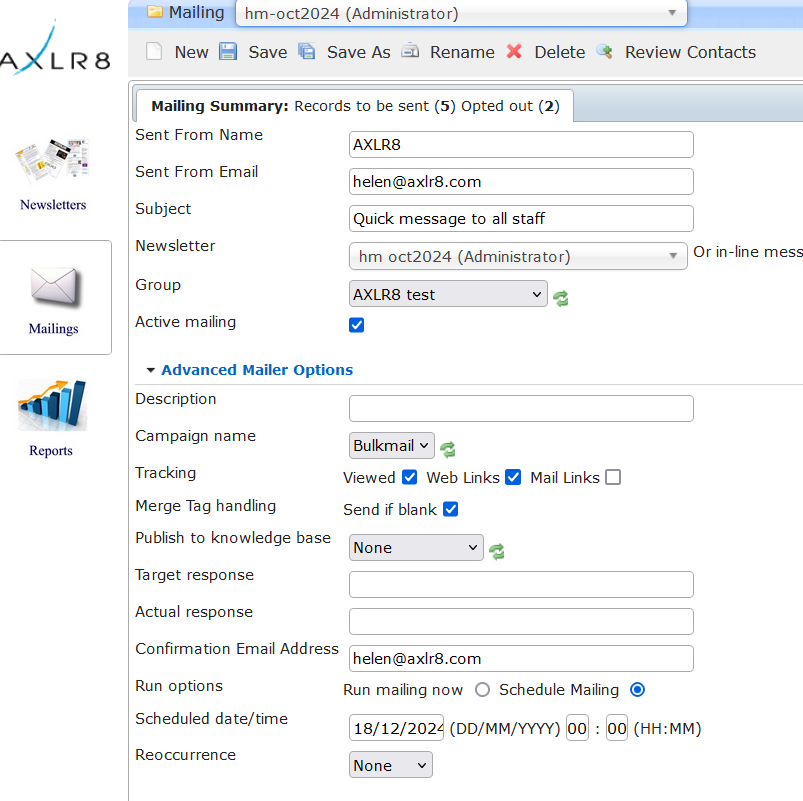
When setting up the mailing, within the Advanced Mailer Options, change the “Run mailing now” option to “Schedule Mailing”.
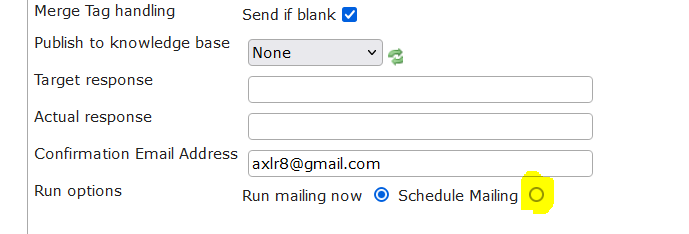
Further options will then appear. In the “Scheduled date/time” fields enter the date and time of the first occurrence of the mailing.
In the Reoccurrence dropdown, select whether the mailer should be sent daily, weekly or monthly. The next dropdown will differ according to whether you have selected daily, weekly or monthly. In the example below, “Weekly” has been selected, so the day of the week needs to be chosen. If “Monthly” is selected, the date within the month needs to be chosen. Finally, select whether the mailer should run indefinitely as below, or if for example it needs to run weekly for a full year, set it to 52 occurrences.
You can check on the Mailings that have been scheduled by clicking on the Reports tab, and then Scheduled Mailings.

It is easy to see the mailer with subject line, group and scheduled date/time in the queue. If any changes need to be made, go back to the Mailings tab, select the mailer, change appropriately and re-save. Delete the mailer within the Mailings tab if you need to abandon the scheduling.
Newsletters can be as simple or complex as you like. This article demonstrates the simple creation of a mailer with words, pictures, and all-important hyperlinks.
Access the Newsletter Builder by clicking “Newsletters” from the Mailing Manager menu.
Within your system, there will be some pre-setup “Building Blocks”. To begin with, it is easiest to start with one of these. Click the icon highlighted below to “Insert Predefined Building Block”.
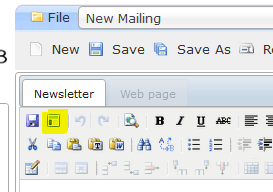
You will be presented with a drop down list of all available templates. Select one that looks appropriate and click “Insert”. You will have the basis of a newsletter ready.
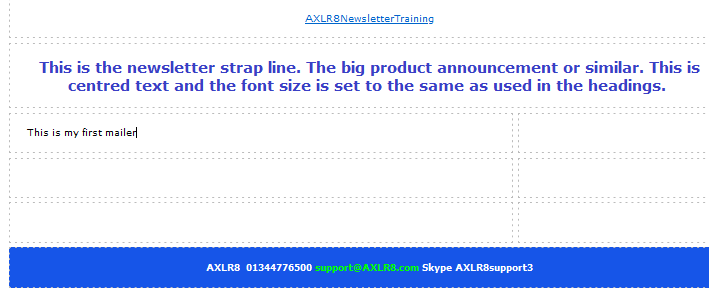
Add text by positioning the cursor and just type:
To change font colour, positioning, styling, firstly highlight the text, and then click the relevant icon:

Likewise, to change font, or font size, use the dropdown options below:

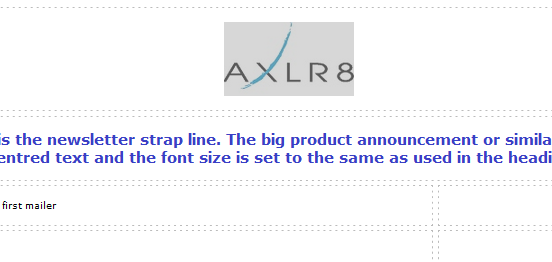
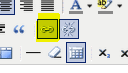
To add a picture, position the cursor where you would like the image to be. Then click the “Insert / Edit Image” icon as below:

Ideally have the image correctly-sized already on your PC and browse for this using the Upload button. Otherwise you can define the size later with the “Appearance” tab. Alternatively, if the image is online already, the URL can be entered directly into the “Image URL” field. Whichever method is used, then click Insert””Ideally have the image correctly-sized already on your PC and browse for this using the Upload button. Otherwise you can define the size later with the “Appearance” tab. Alternatively, if the image is online already, the URL can be entered directly into the “Image URL” field. Whichever method is used, then click “Insert”.
It is essential to include hyperlinks as click throughs can be measured in Mailing Manager reports, and also using Google Analytics. To make the AXLR8 logo click through to the AXLR8 website, firstly click the logo:
Then click the Link icon:
Add the appropriate URL as below and always select the target to open in a new window, especially if the mailer is to be published online.
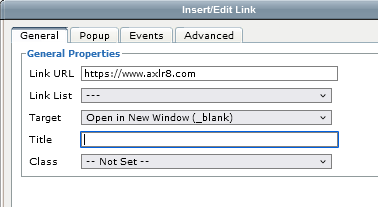
Click to Update.
This FAQ has covered the basics, but there are many more options on the toolbar with which you can enhance your mailers. Please read further FAQs, or just experiment!
Finally, do not forget to SAVE your work! Click “Save” or “Save As” on the top menu and name appropriately.
Every mailing sent out has the legally required “Unsubscribe” link in the footer. When this is clicked by the recipient, they are taken to a separate page to complete the opt out process. Once finalised, the “Send HTML Mailshots” lookup for their contact is set to “No”. For any future mailing, even when their name may appear in the mailing list, they will be excluded automatically.
To search for those that have unsubscribed and will not be benefitting from any future information from your company, you just need to search for those contacts where the “Send HTML Mailshots” lookup = “No”.
On the main screen, click the “Contact” dropdown list and scroll down to select “Send HTML Mailshots”. Double click in the empty field immediately to the right of this and double click “No”. The search criteria will be entered in the search panel to the right. Click on Search below, as highlighted in the screenshot.
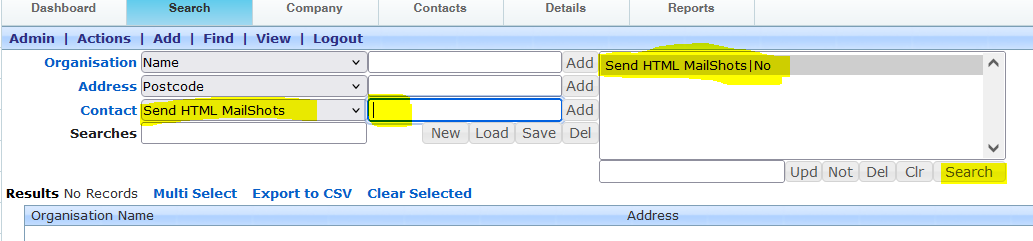
All contacts that have unsubscribed from mailings will be listed below.
This demonstrates the importance of fine tuning mailing lists so that only contacts that are likely to be interested in the content of your mailing receive it, minimising the risk that they will unsubscribe. Once unsubscribed, they are lost for ever, unless a phone call can persuade them to resubscribe of course.
The key feature of the Mailing Manager is to send out the same information in bulk to everyone on a specific distribution list. The list should be defined as accurately as possible so that the content is pertinent to the recipient. The last thing you want is for them to unsubscribe because it is not of interest, as then they are lost to you for ever! The Mailing manager automatically excludes anyone that has unsubscribed from future mailings.
Build your mailing list from the main search screen. In the below example, anyone on the database within the RG postcode area, with an email address, has been found. There are 55 of them.
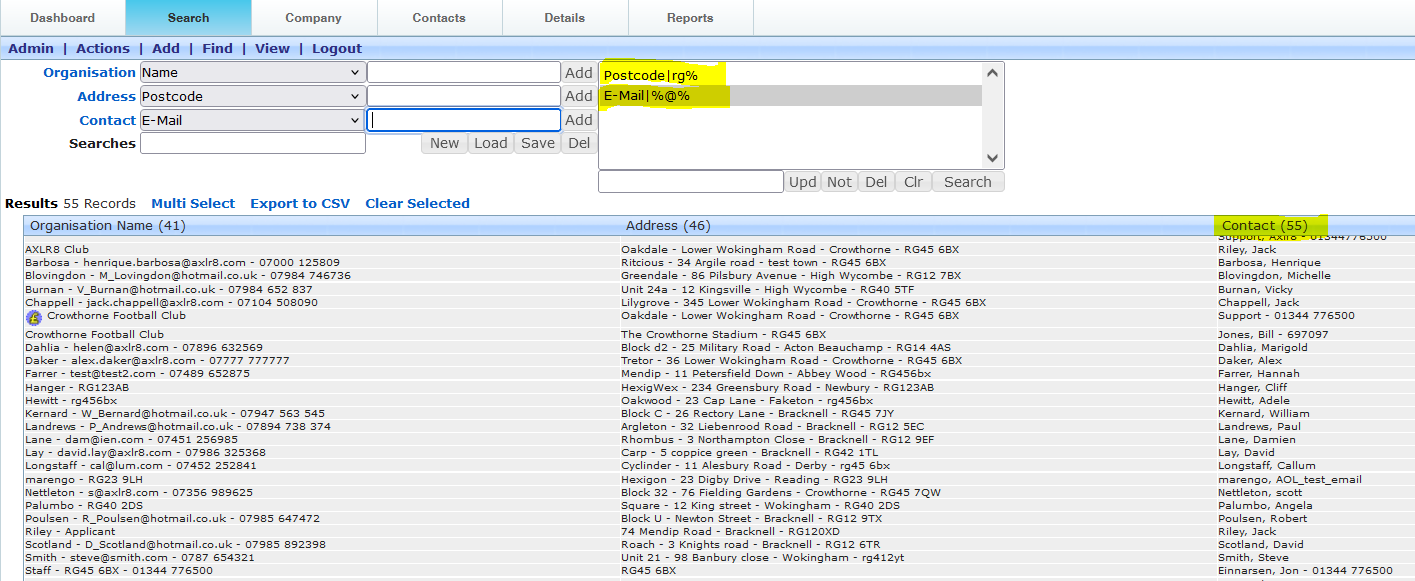
Click “New” as highlighted below.
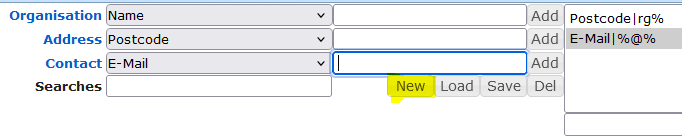
Enter a name for your new “Group” and click OK. Make sure the name explains accurately what the list is.
The list name will automatically appear in the dropdown for selection when sending any future mailing.
I have scheduled a mailing but now don’t want to send it, or want to change it.
Firstly, go the Mailings > Reports > Scheduled Mailings tab, and note the Mailing name. In the case below, it is “hm-oct2024”.

Go to the Mailings tab and find the appropriate mailing in the drop down list.
If you want to change the date / time that the mailing is scheduled to be sent, scroll down to where this is specified, change accordingly and save.
If you want to stop the mailing being sent at all, click the “Delete” button on the top menu to remove the mailing. When you return to the list of Scheduled Mailings in the Reports tab, the mailing in question will not be detailed.
Sending out a mailing just ties together the newsletter that you have created with the mailing list to send to. You add a catchy subject line, and state when it should go.
Click on the Mailings button within the Mailing Manager.
On the Mailings page, you need to firstly enter the email to send from – this may well default to the company email that has been defined, but this can be overwritten.
Think of a subject line that will entice recipients to open, read and digest the contents of the email that you have worked so hard to create.
Select the newsletter that you have built from the dropdown list.
Select the “Group” or distribution list to send to, and click the “Active Mailing” checkbox.
On the lower panel, ensure that the Tracking field has the “Viewed” and “Web Links” ticked, as these will then be monitored in the Reports later.
Add an email address in the “Confirmation Email Address” field for a mini report to be sent to once the mailing has completed.
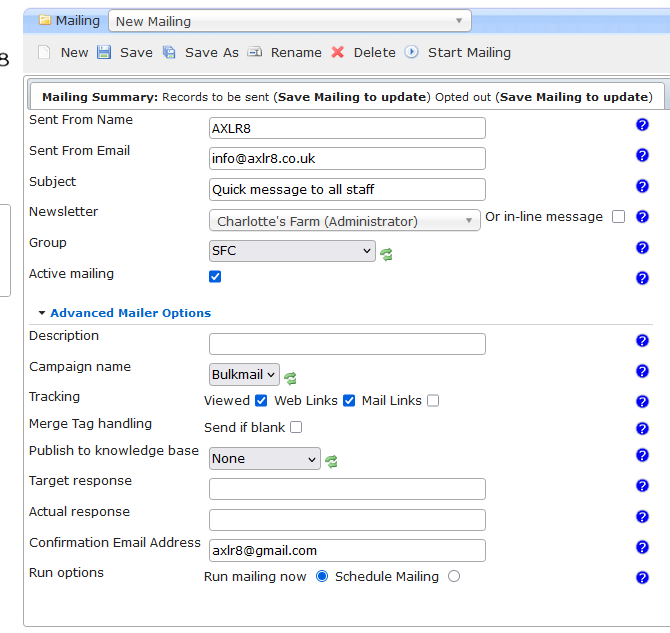
Save your Mailing!
Click Start Mailing on the top menu.

You will then be notified of the number of emails you will be sending out, and if any of them have unsubscribed previously. Emails are not sent to contacts that have unsubscribed.
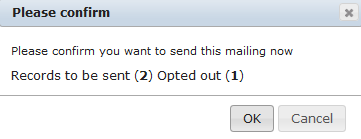
Click OK to send the mailing.
A client asked how they could send a regular, recurring email out to staff to remind them to check their days, hours and pay on the AXLR8 Staff App. It was important the check was done by their brand ambassadors before the payroll run – not afterwards. Accounts department were previously receiving corrections and queries after the payroll run. That meant much more admin. If you use AXLR8 you will be familiar with the Pay Queries function in the app which already saves admin and provides an audit trail.
So they created a newsletter template in AXLR8 Newsletter Builder. It explained why it was better for everyone for the staff to check their hours and pay in the pay tab before payday each week.
Once the template was set up and the relevant staff added to a dynamic search, they set up the recurring mailing schedule. To do this, they went into the mailings tab as usual and selected a sender and the newsletter template. Then they opened the Advanced Tab. Sounds scary but it is actually full of useful options. Your options may be different to the screenshot depending on what social media publishing functions you have configured.
Then they selected the schedule options they wanted. This is shown at the bottom of the screen shot below.
As you can see, they changed the “Run Options” from just running straight away to “Schedule Mailing”.
Then they chose “Weekly” and asked the system to send it every Monday at 11 a.m. Obviously, we then took out an PII before making this screenshot.
Other uses of repeating email templates
Other reasons to send recurring mailings include debt collection and certain marketing follow ups. Let us know if we can assist you to set these up. One of our customers used to send out a weekly mailer to local businesses with a new account form for her taxi company and an incentive. In a month, it brought her two of the largest companies in the area as clients.
Intelligent Mailings
If your mailing must go out on special events in specific conditions with specific contents, you may need to use AXLR8 Trigaware TM . In that case, please contact Support
Payroll
Once you have run through all your selection procedures and wish to add an applicant to your “staff bank” for shifts, you simply find their record and
- press “Promote to staff”
or
- set the JAS (Job Application Status) to a hired value as determined by your company.
then the person becomes “Staff”.
They may never actually work for you or get paid at this stage but they will have access to the Staff Portal and they can be booked for shifts and events and be able to add and update certain details in their own staff records.
At a point in your staff acquisition and selection process, you will make a decision to offer them employment and eventually hire them. We call this process “Promote to staff”. In some AXLR8 ATS systems with a high vetting requirement, the link may also be called “Invite to Interview” or similar in companies in a regulated industry with high vetting standards. Examples include security staffin, the care sector and airports.
What happens when I promote somone to staff?
Their employee record is set up and they get their welcome, offer letter explaining any further information required for acceptance/payroll and vetting processes as well as access to the AXLR8 Staff app.
Further details on the promote to staff automation.
Collecting further details post-hiring
Some employers may decide to collect certain information of a private nature after the decision to hire.
AXLR8 provides many options for this and any continual staff details updates required. The main tools are:
- AFB (AXLR8’s Application Form Builder)
- AXLR8 Vetting Module (which is for managing your BS7858 compliance) and
- the AXLR8 Staff app (also available as a web portal)
Further details on collecting data following job offer or hired stage
A client asked how they could send a regular, recurring email out to staff to remind them to check their days, hours and pay on the AXLR8 Staff App. It was important the check was done by their brand ambassadors before the payroll run – not afterwards. Accounts department were previously receiving corrections and queries after the payroll run. That meant much more admin. If you use AXLR8 you will be familiar with the Pay Queries function in the app which already saves admin and provides an audit trail.
So they created a newsletter template in AXLR8 Newsletter Builder. It explained why it was better for everyone for the staff to check their hours and pay in the pay tab before payday each week.
Once the template was set up and the relevant staff added to a dynamic search, they set up the recurring mailing schedule. To do this, they went into the mailings tab as usual and selected a sender and the newsletter template. Then they opened the Advanced Tab. Sounds scary but it is actually full of useful options. Your options may be different to the screenshot depending on what social media publishing functions you have configured.
Then they selected the schedule options they wanted. This is shown at the bottom of the screen shot below.
As you can see, they changed the “Run Options” from just running straight away to “Schedule Mailing”.
Then they chose “Weekly” and asked the system to send it every Monday at 11 a.m. Obviously, we then took out an PII before making this screenshot.
Other uses of repeating email templates
Other reasons to send recurring mailings include debt collection and certain marketing follow ups. Let us know if we can assist you to set these up. One of our customers used to send out a weekly mailer to local businesses with a new account form for her taxi company and an incentive. In a month, it brought her two of the largest companies in the area as clients.
Intelligent Mailings
If your mailing must go out on special events in specific conditions with specific contents, you may need to use AXLR8 Trigaware TM . In that case, please contact Support
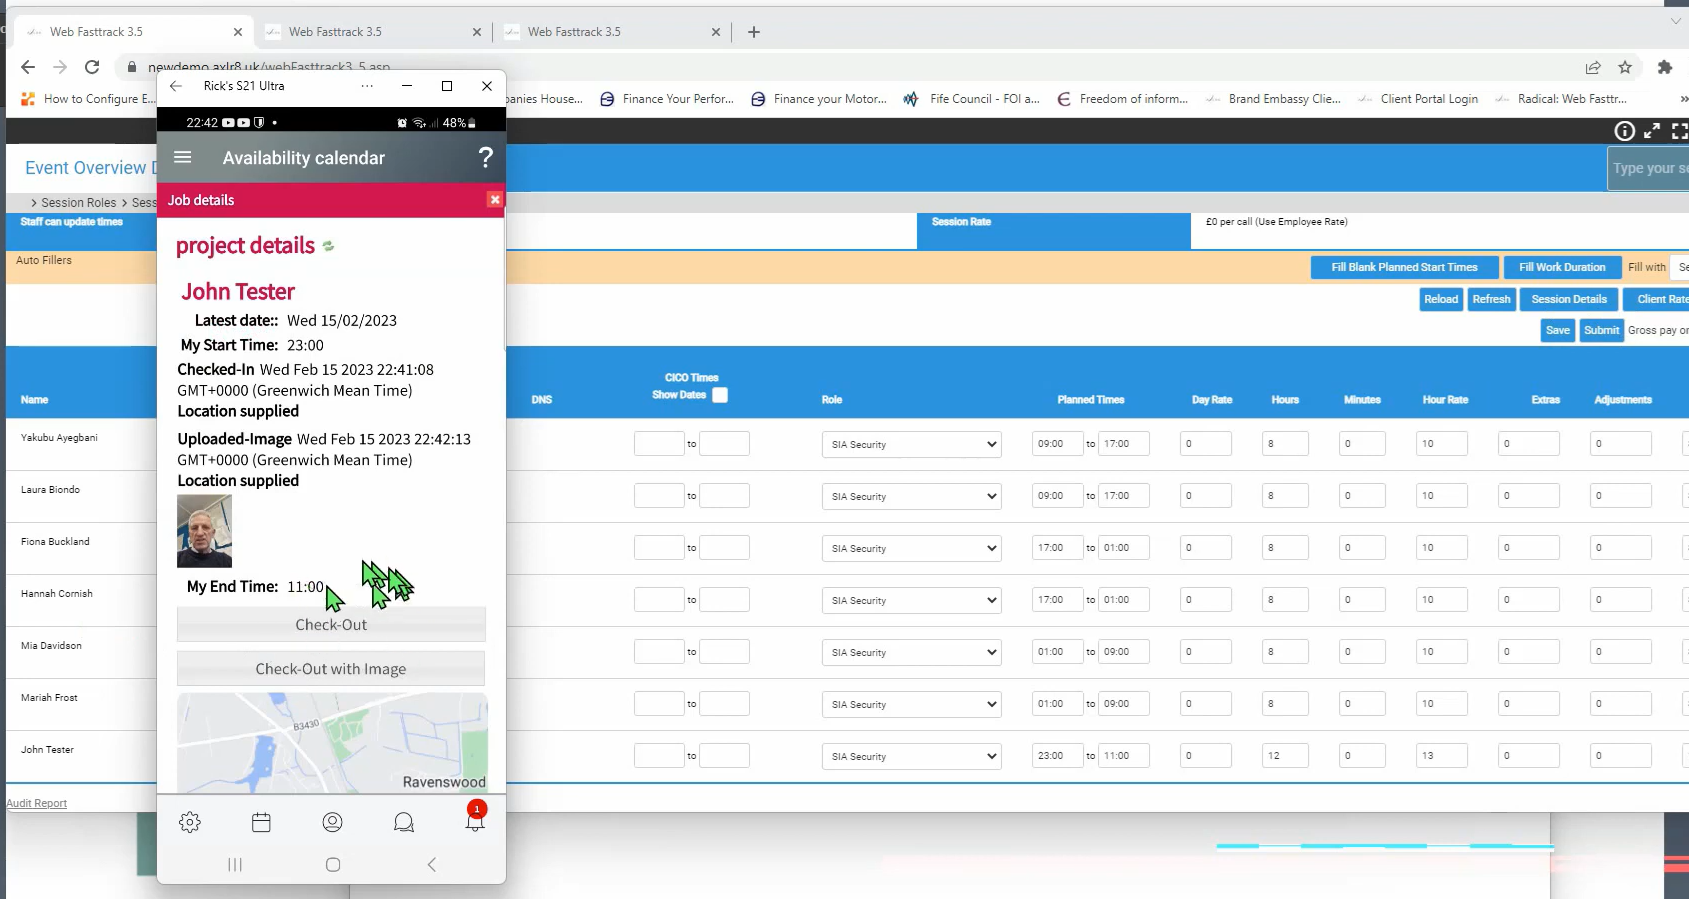
These three videos show how you can set up rosters for staffing shifts with all the paramaters you need. Then the system will do the rest for you.
- Dates
- Start and end Times
- Roles
- Payroll Rates
- Client Invoice Rates
- Locations for geofencing and time and attendance.
- Briefing documents
- Staff portal and AXLR8 Staff App information.
AXLR8 Staffing Customer Invoice Part 1 of 3 Intro 7min29sec
AXLR8 Staffing Customer Invoice Part 2 of 3 Approval 6min44sec
AXLR8 Staffing Customer Invoice Part 3 of 3 Invoice Production 7min44sec
AXLR8 provides many options for collecting further information during employment. You can continue to update staff details when required.
The main tools which may be used, in combination or alone, are:
- AFB (AXLR8’s Application Form Builder)
- AXLR8 Vetting Module (which is for managing your BS7858 compliance) and
- the AXLR8 Staff app (also available as a web portal).
Second Application form
Once hired, you may send staff to a secondary form built using AFB . This may ask for details for payroll and the completion of the form may be set up for the applicant a condition of employment. It is sometimes called the “Job Offer Acceptance” form. That is because it contains the job contract and one or more acceptance confirmations. It may contain requests for bank details and other information you that is inappropriate at an earlier stage in the candidate journey.
In regulated industries such as Care sector, Security, Airside staffing, your Vetting procedures may also be carrying on for a period using a standard such as BS7858. In security agencies, BS7858 vetting can carry on for 12 weeks whilst the staff are working on shifts.
Staff App or Staff Portal
Your company’s AXLR8Staff App (or staff web portal) allows the addtion and up date of information by the staff member.
If some details were not collected during the employment selection process, the staff member may also add them through the App or Staff Portal. These details may include payroll details, bank account details, date of birth, rights to work information. It may be that your business needs to see originals of documents as part of your process and, in that case, the HR team can upload scans/pictures of them and sign them off online.
You can find more detail here.
If you either
- click on “Promote to staff” or
- set the JAS (Job Application Status) to a hired value as determined by your company
then the person becomes “Staff”. They may never actually work for you or get paid at this stage but
- they will have access to the Staff Portal and AXLR8 Staff app and
- they can be booked for
- pre-planned vetting workshops and interviews and for
- shifts and events.
At a point in your staff acquisition and selection process, you will make a decision to offer them employment and eventually hire them. We call this process “Promote to staff”. In some AXLR8 ATS systems with a high vetting requirement, the link may also be called “Invite to Interview” or similar. The reason for this is they are required to bring a number of original documents to an interview workshop such as PoID, PoA, and much more Also, several weeks of BS7858 vetting carry on during their initial work shifts.
So, what does “Promote to Staff” actually do?
This simple click takes the contact details of the applicant and automatically does everything you need to create the User account and employee record.
- creates a user account on the system with “Staff” rights. That mean they can log in to the staff web portal and also access the “AXLR8 Staff” app on their mobile phone.
- Normally creates the next employee number and allocates it. However, in some businesses this may be done elsewhere and AXLR8 have several varietions and you can manually take a personel number form another system if you wish.
- Additionally, various pieces of data collected during their candidate journey are registered in their employee records including.
- Autocreation of a unique log in name. Normally
(perhaps with a number added if a duplicate) - Password (encrypted) used in the application. (password reset if the staff member has forgotten)
- More readable friendly name (can containg duplicates)
- Contact details such as email (for password reset) and mobile number,
- Right to work details such as passport and visa numbers, types, expiries, NI number, etc.
- Date of Birth
- Bank account details if collected already
- Default Staff portal log in
- Default chosen by your business for whether or not they can see payroll on the app.
- Autocreation of a unique log in name. Normally
Sends Welcome/Job Offer email
It normally sends out an automatic welcome letter depending upon data still to be collected from that staff member, it may also contain a set of instructions and a link to a further job acceptance form or tell them to fill in the details on their AXLR8 Staff app. Please check that yours is in your package and that its template contents have been created, approved and configured for your company.
Right to Work
There are many tools for doing this in AXLR8. Let us look at three examples.
Application Form
Using AXLR8 Application Form Builder (AFB) you can create conditional questions. These can be made to follow the logic shown in this flowchart.
Vetting Workshop
Using AXLR8 Vetting to support your BS7858 process you can collect and approve all the data you need including:
- Proof of ID
- Proof of Address
- Confirmation correspondence from 5 years employment history
- Visas and other BRP and work documents
- SIA badge checks
- Others.
The original documents s should be checked and authenticated by a qualified vetting manager
Online Checks with Rightcheck
Checking online is integrated with AXLR8 using the Rightcheck service. It works seamlessly within the AXLR8 Job Application Journey. There are more details in this article.
Feel free to contact your Support consultant if you do not find your answers in FQ or enough training material. Also, get in touch with your account manager if you have not purchased the modules listed above.
Once you have run through all your selection procedures and wish to add an applicant to your “staff bank” for shifts, you simply find their record and
- press “Promote to staff”
or
- set the JAS (Job Application Status) to a hired value as determined by your company.
then the person becomes “Staff”.
They may never actually work for you or get paid at this stage but they will have access to the Staff Portal and they can be booked for shifts and events and be able to add and update certain details in their own staff records.
At a point in your staff acquisition and selection process, you will make a decision to offer them employment and eventually hire them. We call this process “Promote to staff”. In some AXLR8 ATS systems with a high vetting requirement, the link may also be called “Invite to Interview” or similar in companies in a regulated industry with high vetting standards. Examples include security staffin, the care sector and airports.
What happens when I promote somone to staff?
Their employee record is set up and they get their welcome, offer letter explaining any further information required for acceptance/payroll and vetting processes as well as access to the AXLR8 Staff app.
Further details on the promote to staff automation.
Collecting further details post-hiring
Some employers may decide to collect certain information of a private nature after the decision to hire.
AXLR8 provides many options for this and any continual staff details updates required. The main tools are:
- AFB (AXLR8’s Application Form Builder)
- AXLR8 Vetting Module (which is for managing your BS7858 compliance) and
- the AXLR8 Staff app (also available as a web portal)
Further details on collecting data following job offer or hired stage
AXLR8 provides many options for collecting further information during employment. You can continue to update staff details when required.
The main tools which may be used, in combination or alone, are:
- AFB (AXLR8’s Application Form Builder)
- AXLR8 Vetting Module (which is for managing your BS7858 compliance) and
- the AXLR8 Staff app (also available as a web portal).
Second Application form
Once hired, you may send staff to a secondary form built using AFB . This may ask for details for payroll and the completion of the form may be set up for the applicant a condition of employment. It is sometimes called the “Job Offer Acceptance” form. That is because it contains the job contract and one or more acceptance confirmations. It may contain requests for bank details and other information you that is inappropriate at an earlier stage in the candidate journey.
In regulated industries such as Care sector, Security, Airside staffing, your Vetting procedures may also be carrying on for a period using a standard such as BS7858. In security agencies, BS7858 vetting can carry on for 12 weeks whilst the staff are working on shifts.
Staff App or Staff Portal
Your company’s AXLR8Staff App (or staff web portal) allows the addtion and up date of information by the staff member.
If some details were not collected during the employment selection process, the staff member may also add them through the App or Staff Portal. These details may include payroll details, bank account details, date of birth, rights to work information. It may be that your business needs to see originals of documents as part of your process and, in that case, the HR team can upload scans/pictures of them and sign them off online.
You can find more detail here.
If you either
- click on “Promote to staff” or
- set the JAS (Job Application Status) to a hired value as determined by your company
then the person becomes “Staff”. They may never actually work for you or get paid at this stage but
- they will have access to the Staff Portal and AXLR8 Staff app and
- they can be booked for
- pre-planned vetting workshops and interviews and for
- shifts and events.
At a point in your staff acquisition and selection process, you will make a decision to offer them employment and eventually hire them. We call this process “Promote to staff”. In some AXLR8 ATS systems with a high vetting requirement, the link may also be called “Invite to Interview” or similar. The reason for this is they are required to bring a number of original documents to an interview workshop such as PoID, PoA, and much more Also, several weeks of BS7858 vetting carry on during their initial work shifts.
So, what does “Promote to Staff” actually do?
This simple click takes the contact details of the applicant and automatically does everything you need to create the User account and employee record.
- creates a user account on the system with “Staff” rights. That mean they can log in to the staff web portal and also access the “AXLR8 Staff” app on their mobile phone.
- Normally creates the next employee number and allocates it. However, in some businesses this may be done elsewhere and AXLR8 have several varietions and you can manually take a personel number form another system if you wish.
- Additionally, various pieces of data collected during their candidate journey are registered in their employee records including.
- Autocreation of a unique log in name. Normally
(perhaps with a number added if a duplicate) - Password (encrypted) used in the application. (password reset if the staff member has forgotten)
- More readable friendly name (can containg duplicates)
- Contact details such as email (for password reset) and mobile number,
- Right to work details such as passport and visa numbers, types, expiries, NI number, etc.
- Date of Birth
- Bank account details if collected already
- Default Staff portal log in
- Default chosen by your business for whether or not they can see payroll on the app.
- Autocreation of a unique log in name. Normally
Sends Welcome/Job Offer email
It normally sends out an automatic welcome letter depending upon data still to be collected from that staff member, it may also contain a set of instructions and a link to a further job acceptance form or tell them to fill in the details on their AXLR8 Staff app. Please check that yours is in your package and that its template contents have been created, approved and configured for your company.
Sales Forecast and Quotes
Select the person the call or task is for as up usually would and then apply these two steps to set it up and add the calendar entry. This will allow you to synchronise the action with your mobile device alarms if you have that stuff all set up.
Set your call parameters
First hit create Call or Task. Note that the two words are interchangeable although the original purpose of the Call Centre (AKA Task Centre) was for proactive customer calls. This will almost always be from a contact record – i.e. a person’s details. However, it may be from a task that is being create to follow on from a previously completed task in your Call Centre.
Save to Outlook
Then tick the “Save in Outlook” box as shown below.
This will download an Outlook calendar file and ask you if you will allow it to be added to your calendar. This extra click is necessary for security reasons on your device. It is not secure to allow a browser to access your calendar with out your explicit permission.
Then you can open it, decide to invite others, set alarms, categorise it and do all the other things Outlook allows.
Other Calendars
It is a pretty standard file and should work with whatever your default calendar is.
SMS Text Messaging
Background
This blog explains why clients need to move to the “new supplier”.
What to do
You need to register for a new account with a replacement SMS messaging system. There are plenty of alternatives (including not using text messaging any more). If you choose WebexInteract, they are part of the same company and will transfer your credits across. This is better than trying to use them up before the end of November.
Whatever alternative you choose, please check the list of compatibility requirements listed below.
Step 1 Register with an SMS Supplier
WebexInteract explains, below, how to setup with Webex
- Each client should create a new account on Webex Interact at www.webexinteract.com.
- They should export any important data (contacts, opt-out lists, etc.) from their Textlocal account.
- They will then import this data into their new Webex Interact account.
- Once their new account is set up, they can notify us, and we will arrange for any remaining credits to be transferred from their Textlocal account.
If you move to WebexInteract, you can transfer over your text credits from your TXTLocal account. (If you do not move to TextLocal they offer cash back which will buy you around half the credits you had.) This article, toether with their help text, explains how to creat senders on their new portal.
Step 2 Request AXLR8 to add your new SMS supplier
Contact AXLR8 Support with your chosen supplier and we will connect it up so it sends texts on your behalf.
If you use an alternative to WebexInteract, you will need to be sure it ticks the following three boxes in order for it to work.
Compatability Requirements for any AXLR8 SMS Service
- Dedicated telephone number for sending. Also, you may need the ability to deal with replies to text messages.
- Email2SMS facility whereby a message can be sent from you to
@ - Supports a protocol compatible with AXLR8.
You will also need AXLR8’s SMS Managed Service.
Any questions? Please report any problems you encounter to support@axlr8.com or call up on 01344 776500. We are happy to invest time with you working through any issues that arise up until 23rd November. After that, we will help as we can as the Cisco imposed deadline (30th November) will be close. See this FAQ if you need to pretest your new WebexInteract account technical readiness for AXLR8’s email2SMS
Email to SMS goal
As the name suggests, an email to sms conversion service sends texts. You set it up to receive your email containing:
- the mobile number of the recipient
- and the message you want to send.
The service then converts it to an SMS message (i.e. text message) and the recipient recieves it on their phone.
Here is how to set this up with WebexInteract.
Their portal is brand new and rather different from the portal provided by the other in-house Cisco provider. (Textlocal is also owned by Cisco but the service is being consolidated into WebexInteract.)
The portal is to be found here: www.webexinteract.com.
Open an account
You will be asked for an email which will also be your user name for their portal and you must create a password. You will also have to deal with a validation email so that Cisco can be sure it is a real email address. once that is done you have configured your “default email” e.g. james@mycompany.com
Adding a Sender
This is a confusing word as it gives teh impression you are setting up an authorised email to send. However, it is actually what the recipient sees as a sender.
If you do not have a dedicated number (see below), you must mask the shared sending number provided by the service so that people cannot reply. This is on the first page together with rules for the characters you can use and up to 11 characters (like a phone number has 11 digits). For example, (see screenshot below) AXLR8 use “AXLR8-passw” for MFA.
You must allow a day for approval of this code by CISCO. It is a manual approval (so somone does not choose, say, “NATWEST” ro “BARCLAYS”. In general, you should allow a couple of days for various checking and approval processes.
You should then be able to get a few credits – maybe 10 at 3.9p each (£0.39).
All this must be done before you are able to send tests.
Allowed List
This refers to the list of email ddresses allowed to send email2text.
However, we cannot switch your AXLR8 system (see last section) over to WebexInteract till you add all your Allowed Senders (email addresses permitted by you to send SMS messages).
If you need other people to be authorised to send texts on your behalf, you go to left hand side menu -> Integrations -> Email to SMS
Scroll down to Sender and add to the Allowed List. Please note that the ones in the list below are not real examples so don’t bother trying to use them!
The default text length limit setting is one unit (160 char). You could keep it there or add units. Make sure you get the next settings right if you use emails to sms from Outlook as you may send out loads of units because it added your email signature (or even a whole email trail). Putting ## on the end of the text you want to send from your email may help this.
Testing your first email2SMS
To test your email2SMS send from an authorised Sender on your allowed list. Send it to mobiletelephonenumber@e2sms.webexinteract.com. If it does not arrive and the delivery failure email does not help you solve the problem, please send the delivery error message to WebexInteract Support department or use the Support Chat function.
Teammates
“Teammates” in WebexInteract parlance are co-administrators. Thus, you can have more than one person helping you with the set up and management of your account. They must be unique, emails and will need to pass a validation process. A person does not have to be a Teammate to send emails. That permission is granted in the “Allowed List” mentioned above.
Want to set up additional people who are able to access the portal as well so you can delegate management of the process? To do this just find the Teammates item in the Account menu at the top.
WebexInteract have support facilites and documentation on the site to help you. We have been able to help some clients but are out of time except for chargeable work, now.
Dedicated Number
If you buy a dedicated number, that will allow you to send and receive SMS messages in and out of your user email acccount as you can with the AXLR8 scheme now.
AXLR8 Changes
When you have set up your WebexInteract system, we can then change the required settings in AXLR8 to your database. We need up to a few days to test and check this. Your WebexInteract system settings must be complete by midnight on 23rd November as we have to enter the new serice into your AXLR8 server and Cisco need to transfer your text credits across. Cisco have rejected our requests to extend the time limit of 30th November.
We can only do this once at no charge. If we make the AXLR8 changes and then have to be change your database back because WebexInteract is not set up correctly, then we may need to charge a small fee for setting the system back and reseting it to WebexInteract when you have completed the setup steps above correctly.
Need Help to set up WebexInteract?
Don’t for get to ask for your present credits on TextLocal to be moved over. Make sure you count the credits before your transfer and check them afterwards to ensure you have the number of credits you bought and not the monetary value which is about half as Cisco have doubled the price.
If you do not have the resources internally to accomplish this task in time, AXLR8 have a package at £550 plus VAT to if you would like us to do it for you.
Staff Portal
Once you have run through all your selection procedures and wish to add an applicant to your “staff bank” for shifts, you simply find their record and
- press “Promote to staff”
or
- set the JAS (Job Application Status) to a hired value as determined by your company.
then the person becomes “Staff”.
They may never actually work for you or get paid at this stage but they will have access to the Staff Portal and they can be booked for shifts and events and be able to add and update certain details in their own staff records.
At a point in your staff acquisition and selection process, you will make a decision to offer them employment and eventually hire them. We call this process “Promote to staff”. In some AXLR8 ATS systems with a high vetting requirement, the link may also be called “Invite to Interview” or similar in companies in a regulated industry with high vetting standards. Examples include security staffin, the care sector and airports.
What happens when I promote somone to staff?
Their employee record is set up and they get their welcome, offer letter explaining any further information required for acceptance/payroll and vetting processes as well as access to the AXLR8 Staff app.
Further details on the promote to staff automation.
Collecting further details post-hiring
Some employers may decide to collect certain information of a private nature after the decision to hire.
AXLR8 provides many options for this and any continual staff details updates required. The main tools are:
- AFB (AXLR8’s Application Form Builder)
- AXLR8 Vetting Module (which is for managing your BS7858 compliance) and
- the AXLR8 Staff app (also available as a web portal)
Further details on collecting data following job offer or hired stage
AXLR8 provides many options for collecting further information during employment. You can continue to update staff details when required.
The main tools which may be used, in combination or alone, are:
- AFB (AXLR8’s Application Form Builder)
- AXLR8 Vetting Module (which is for managing your BS7858 compliance) and
- the AXLR8 Staff app (also available as a web portal).
Second Application form
Once hired, you may send staff to a secondary form built using AFB . This may ask for details for payroll and the completion of the form may be set up for the applicant a condition of employment. It is sometimes called the “Job Offer Acceptance” form. That is because it contains the job contract and one or more acceptance confirmations. It may contain requests for bank details and other information you that is inappropriate at an earlier stage in the candidate journey.
In regulated industries such as Care sector, Security, Airside staffing, your Vetting procedures may also be carrying on for a period using a standard such as BS7858. In security agencies, BS7858 vetting can carry on for 12 weeks whilst the staff are working on shifts.
Staff App or Staff Portal
Your company’s AXLR8Staff App (or staff web portal) allows the addtion and up date of information by the staff member.
If some details were not collected during the employment selection process, the staff member may also add them through the App or Staff Portal. These details may include payroll details, bank account details, date of birth, rights to work information. It may be that your business needs to see originals of documents as part of your process and, in that case, the HR team can upload scans/pictures of them and sign them off online.
You can find more detail here.
If you either
- click on “Promote to staff” or
- set the JAS (Job Application Status) to a hired value as determined by your company
then the person becomes “Staff”. They may never actually work for you or get paid at this stage but
- they will have access to the Staff Portal and AXLR8 Staff app and
- they can be booked for
- pre-planned vetting workshops and interviews and for
- shifts and events.
At a point in your staff acquisition and selection process, you will make a decision to offer them employment and eventually hire them. We call this process “Promote to staff”. In some AXLR8 ATS systems with a high vetting requirement, the link may also be called “Invite to Interview” or similar. The reason for this is they are required to bring a number of original documents to an interview workshop such as PoID, PoA, and much more Also, several weeks of BS7858 vetting carry on during their initial work shifts.
So, what does “Promote to Staff” actually do?
This simple click takes the contact details of the applicant and automatically does everything you need to create the User account and employee record.
- creates a user account on the system with “Staff” rights. That mean they can log in to the staff web portal and also access the “AXLR8 Staff” app on their mobile phone.
- Normally creates the next employee number and allocates it. However, in some businesses this may be done elsewhere and AXLR8 have several varietions and you can manually take a personel number form another system if you wish.
- Additionally, various pieces of data collected during their candidate journey are registered in their employee records including.
- Autocreation of a unique log in name. Normally
(perhaps with a number added if a duplicate) - Password (encrypted) used in the application. (password reset if the staff member has forgotten)
- More readable friendly name (can containg duplicates)
- Contact details such as email (for password reset) and mobile number,
- Right to work details such as passport and visa numbers, types, expiries, NI number, etc.
- Date of Birth
- Bank account details if collected already
- Default Staff portal log in
- Default chosen by your business for whether or not they can see payroll on the app.
- Autocreation of a unique log in name. Normally
Sends Welcome/Job Offer email
It normally sends out an automatic welcome letter depending upon data still to be collected from that staff member, it may also contain a set of instructions and a link to a further job acceptance form or tell them to fill in the details on their AXLR8 Staff app. Please check that yours is in your package and that its template contents have been created, approved and configured for your company.
Staff Shifts
Pinpointing CICO locations within AXLR8 is vital. Setting an exact site within AXLR8 has never been easier. Our Maps tool allows you to pinpoint a Check In Point to an exact location using our GeoFencing module.
Step 1 – Search for the customer/site that you are looking to set the location for. This can be done within the multi-search, report or the dashboard itself.
Step 2 – If the customer has multiple sites attached. Select the site you are looking to set the CICO location for.
Step 3 – Now you’re on the site you wish to pinpoint the location for, select ‘Map’.
Step 4 – expand the section and use the ‘+’ and ‘-‘ to zoom in and out to find the landmark you’re looking to set the check in point for.
Step 5 – Drag the pin to the location you would like to set as the check in location.
Step 6 – Save the location.
AXLR8 can set the Geo-Fence to your requirements, please feel free to check these with your account manager if you’re unsure, before saving.
These three videos show how you can set up rosters for staffing shifts with all the paramaters you need. Then the system will do the rest for you.
- Dates
- Start and end Times
- Roles
- Payroll Rates
- Client Invoice Rates
- Locations for geofencing and time and attendance.
- Briefing documents
- Staff portal and AXLR8 Staff App information.
AXLR8 Staffing Customer Invoice Part 1 of 3 Intro 7min29sec
AXLR8 Staffing Customer Invoice Part 2 of 3 Approval 6min44sec
AXLR8 Staffing Customer Invoice Part 3 of 3 Invoice Production 7min44sec
- Open the what 3 words app and enter the 3 words here in order to find the exact Latitude and Longitude.
- Click ‘google maps’ Link
- In the URL you will get the Latitude and Longitude data
- Open the venue in AXLR8, click on the address line.
- Open the maps tab and click on ‘show lat/long’.
- Update the lat / long figures to match the google maps
- Zoom in to check it is correct. The common issue with What 3 Words is that one word slightly wrong could be a continent away from the right place! Sometimes toggling to “Satellite” view can be very helpful to ensure accuracy. Check with the client so the exact spot makes sense!
- You may find it easier to maximise the Map view using the button shown in the Satellite screenshot below.
- Save
Staffing Contracts
These three videos show how you can set up rosters for staffing shifts with all the paramaters you need. Then the system will do the rest for you.
- Dates
- Start and end Times
- Roles
- Payroll Rates
- Client Invoice Rates
- Locations for geofencing and time and attendance.
- Briefing documents
- Staff portal and AXLR8 Staff App information.
AXLR8 Staffing Customer Invoice Part 1 of 3 Intro 7min29sec
AXLR8 Staffing Customer Invoice Part 2 of 3 Approval 6min44sec
AXLR8 Staffing Customer Invoice Part 3 of 3 Invoice Production 7min44sec
- Open the what 3 words app and enter the 3 words here in order to find the exact Latitude and Longitude.
- Click ‘google maps’ Link
- In the URL you will get the Latitude and Longitude data
- Open the venue in AXLR8, click on the address line.
- Open the maps tab and click on ‘show lat/long’.
- Update the lat / long figures to match the google maps
- Zoom in to check it is correct. The common issue with What 3 Words is that one word slightly wrong could be a continent away from the right place! Sometimes toggling to “Satellite” view can be very helpful to ensure accuracy. Check with the client so the exact spot makes sense!
- You may find it easier to maximise the Map view using the button shown in the Satellite screenshot below.
- Save
Super User
Once you have run through all your selection procedures and wish to add an applicant to your “staff bank” for shifts, you simply find their record and
- press “Promote to staff”
or
- set the JAS (Job Application Status) to a hired value as determined by your company.
then the person becomes “Staff”.
They may never actually work for you or get paid at this stage but they will have access to the Staff Portal and they can be booked for shifts and events and be able to add and update certain details in their own staff records.
At a point in your staff acquisition and selection process, you will make a decision to offer them employment and eventually hire them. We call this process “Promote to staff”. In some AXLR8 ATS systems with a high vetting requirement, the link may also be called “Invite to Interview” or similar in companies in a regulated industry with high vetting standards. Examples include security staffin, the care sector and airports.
What happens when I promote somone to staff?
Their employee record is set up and they get their welcome, offer letter explaining any further information required for acceptance/payroll and vetting processes as well as access to the AXLR8 Staff app.
Further details on the promote to staff automation.
Collecting further details post-hiring
Some employers may decide to collect certain information of a private nature after the decision to hire.
AXLR8 provides many options for this and any continual staff details updates required. The main tools are:
- AFB (AXLR8’s Application Form Builder)
- AXLR8 Vetting Module (which is for managing your BS7858 compliance) and
- the AXLR8 Staff app (also available as a web portal)
Further details on collecting data following job offer or hired stage
- Open the what 3 words app and enter the 3 words here in order to find the exact Latitude and Longitude.
- Click ‘google maps’ Link
- In the URL you will get the Latitude and Longitude data
- Open the venue in AXLR8, click on the address line.
- Open the maps tab and click on ‘show lat/long’.
- Update the lat / long figures to match the google maps
- Zoom in to check it is correct. The common issue with What 3 Words is that one word slightly wrong could be a continent away from the right place! Sometimes toggling to “Satellite” view can be very helpful to ensure accuracy. Check with the client so the exact spot makes sense!
- You may find it easier to maximise the Map view using the button shown in the Satellite screenshot below.
- Save
Adding a new staff type, category or “contact Status” is done in Dropdowns Admin in the Admin menu. This facility is only available to users with Systems Admin rights. You enter Drop Downs Admin and look for “Contact Status”. This is a single category you put a member of staff into. Here is an example.
A security company wanted to add the following to their list of categories.
- Close Protection Officer
- Behavioural Detection Officer
- Crowd Manager
Below is the video message sent over by a client asking for the above which makes a good real life example.
To accomplish this in the Contact Status Drop downs Admin area, just click new and add the name of your new category.
This is shown in the screenshot below.
- Click “New”
- Add the status (in this case “Close Protection Officer”)
- Choose a back ground and foreground colour if you wish them to be easily distinguished in lists
- Add an order for hem to appear in the drop down menu list of categories (Contact Status) for staff
- Click Save
That’s it really!
Notice also that you can “Disable” Dropdown Menu Items if you wish. Then they will no longer appear in that drop down menu. However, staff who had the disable categorisation before will still have it now. You can leave them that way or you have the option to update them to one of the options in your new list of valid categories.
Other important points are to understand the difference between Contact Status (this parameter which is a single category to put staff into) and JAS or Job Application Status. Contact Status would normally be something like Team leader, Experienced, newbie, unreliable etc. It is also important not to use this list with care for job types where, say, a qualification might expire. SIA Door Manager is an example above. Don’t just choose someone who is categorised as an SIA Door Manager. You must make sure that any shift requiring that SIA Certificate is set up to demand people with that badge. Then when you search for staff not all people in the category will necessarily be able to work all the shifts. The reason will be that the system will look for qualified staff an be aware that a person’s badge runs out half way through the week and allow them on no more bookings. Hopefully, this will be rare. The system should have warned you many months before that the certificate was coming up for expiry
The latter (JAS), as its name suggests, is to mark candidates and staff through the lifecycle of employment. For example, applied, interviewed, offered, rejected, current staff, and then ( on termination of employment) would re-employ and would not re-employ.
To reactivate a disabled login, you must be a Super User. What is an AXLR8 SuperUser? Read more here.
Step 1 – Go to the ‘Admin Menu’ on the left-hand menu.
Step 2 – Select ‘User Admin’
Step 3 – From the ‘Disabled’ dropdown list search for the staff member you need to reactivate.
Step 4 – Click the Activate button
Once the Staff Member/Admin Member has been reactivated, they will be able to log back into the system.
Renaming an organisation is a two click process within the AXLR8 system. You firstly need to go to the organisation that you’re wishing to change.
Once within this screen you will need to click on the edit page icon at the top of the screen. (Please see screenshot below)
Once in this page you will just need to overwrite the organisation field, which is located at the top and then click ‘Save’ which is in the bottom right hand corner of the screen.
If you either
- click on “Promote to staff” or
- set the JAS (Job Application Status) to a hired value as determined by your company
then the person becomes “Staff”. They may never actually work for you or get paid at this stage but
- they will have access to the Staff Portal and AXLR8 Staff app and
- they can be booked for
- pre-planned vetting workshops and interviews and for
- shifts and events.
At a point in your staff acquisition and selection process, you will make a decision to offer them employment and eventually hire them. We call this process “Promote to staff”. In some AXLR8 ATS systems with a high vetting requirement, the link may also be called “Invite to Interview” or similar. The reason for this is they are required to bring a number of original documents to an interview workshop such as PoID, PoA, and much more Also, several weeks of BS7858 vetting carry on during their initial work shifts.
So, what does “Promote to Staff” actually do?
This simple click takes the contact details of the applicant and automatically does everything you need to create the User account and employee record.
- creates a user account on the system with “Staff” rights. That mean they can log in to the staff web portal and also access the “AXLR8 Staff” app on their mobile phone.
- Normally creates the next employee number and allocates it. However, in some businesses this may be done elsewhere and AXLR8 have several varietions and you can manually take a personel number form another system if you wish.
- Additionally, various pieces of data collected during their candidate journey are registered in their employee records including.
- Autocreation of a unique log in name. Normally
(perhaps with a number added if a duplicate) - Password (encrypted) used in the application. (password reset if the staff member has forgotten)
- More readable friendly name (can containg duplicates)
- Contact details such as email (for password reset) and mobile number,
- Right to work details such as passport and visa numbers, types, expiries, NI number, etc.
- Date of Birth
- Bank account details if collected already
- Default Staff portal log in
- Default chosen by your business for whether or not they can see payroll on the app.
- Autocreation of a unique log in name. Normally
Sends Welcome/Job Offer email
It normally sends out an automatic welcome letter depending upon data still to be collected from that staff member, it may also contain a set of instructions and a link to a further job acceptance form or tell them to fill in the details on their AXLR8 Staff app. Please check that yours is in your package and that its template contents have been created, approved and configured for your company.
Each client must have two people trained up as Super Users on AXLR8 systems.
Super User Responsibilities
A Super User must (amongst other things):
- Support other staff within their business using AXLR8 unless some day-to-day details are documented and delegated to team leaders
- Perform systems admin tasks such as changing screens labels and creating reports and templates
- Add and change user credentials
- Set security rules and user restrictions for GDPR and other reasons
- Make sure business processes and contractual agreements and business policies are reflected in AXLR8.
- Contact AXLR8 support.
- Discuss new enhancements with AXLR8
- document how the system facilitates internal procedures and workflow – perhaps with crib cards, user instructions or descriptions on the AXLR8 Staff mobile worker app.
As you can see from the above list, this is a senior management position. Normally, at least one Super User is a director of the company if it is under 100 employees.
AXLR8 Super User Qualifications
The Super User must have the following capabilities.
- Be in a senior (probably leadership) position and understand the business policies and practices and KPIs and the legal environment in which the business operates. For example, they will be aware of the employment and other commercial compliance necessary for the company. They will understand their company’s goals so that they see ho a system can help and make decisions and trade offs. They will be a numerate, manager and understand ignorance of the tax, employment, privacy and other laws is not an excuse.
- The Super User must also have a thorough understanding of how AXLR8 works. That applies both as a user in each of the different teams and departments and as a Systems Administrator controlling access and other parameters.
- Be trusted to make decisions by the senior management team and have the consultation and communications skills to bring staff along with business process changes.
What Lookup type should I use? Within the AXLR8 Staffing System, there are multiple lookup types which each have a different function. There are the following look up types: Text, Whole Number, Number, Date, Yes/No and Memo. Each manages a different type of data.
Text
This is perfect for when you want to store short worded answers, such as their preferred working location or first pet’s name for security reasons.
Whole Number
A whole number is an integer (not a decimal). 2 or 333 or 145 are examples.
Number
Is a lookup where the number can contain a digit(s) after the decimal point e.g. 11.75.
Yes/No
A Yes/No field only allows for those specific answers. If you’re creating an application form and are looking to use conditional sections (“Do you have a UK Driving Licence?”, “Do you have the right to work in the UK?, etc.) You can use these for branch logic.
Date
This does what it says on the tin. It’s a simple date picker. However, it can be customised easily within the set up of the Lookup. If it is for a Date of Birth, you can set a date range to exclude under 18s. To set the date range (As standard it’s 7 years ago and 7 years ahead). Please see here for how to change the date range.
Memo
A memo is a larger text field. Within a memo you can store more in-depth notes on the staff member. Here are some examples. It can be an answer to the question: “Why do you want to join our company?” It can also be for medical history or criminal offence details.
TaskCentre
Select the person the call or task is for as up usually would and then apply these two steps to set it up and add the calendar entry. This will allow you to synchronise the action with your mobile device alarms if you have that stuff all set up.
Set your call parameters
First hit create Call or Task. Note that the two words are interchangeable although the original purpose of the Call Centre (AKA Task Centre) was for proactive customer calls. This will almost always be from a contact record – i.e. a person’s details. However, it may be from a task that is being create to follow on from a previously completed task in your Call Centre.
Save to Outlook
Then tick the “Save in Outlook” box as shown below.
This will download an Outlook calendar file and ask you if you will allow it to be added to your calendar. This extra click is necessary for security reasons on your device. It is not secure to allow a browser to access your calendar with out your explicit permission.
Then you can open it, decide to invite others, set alarms, categorise it and do all the other things Outlook allows.
Other Calendars
It is a pretty standard file and should work with whatever your default calendar is.
- Open the what 3 words app and enter the 3 words here in order to find the exact Latitude and Longitude.
- Click ‘google maps’ Link
- In the URL you will get the Latitude and Longitude data
- Open the venue in AXLR8, click on the address line.
- Open the maps tab and click on ‘show lat/long’.
- Update the lat / long figures to match the google maps
- Zoom in to check it is correct. The common issue with What 3 Words is that one word slightly wrong could be a continent away from the right place! Sometimes toggling to “Satellite” view can be very helpful to ensure accuracy. Check with the client so the exact spot makes sense!
- You may find it easier to maximise the Map view using the button shown in the Satellite screenshot below.
- Save
User Access Rights
To reactivate a disabled login, you must be a Super User. What is an AXLR8 SuperUser? Read more here.
Step 1 – Go to the ‘Admin Menu’ on the left-hand menu.
Step 2 – Select ‘User Admin’
Step 3 – From the ‘Disabled’ dropdown list search for the staff member you need to reactivate.
Step 4 – Click the Activate button
Once the Staff Member/Admin Member has been reactivated, they will be able to log back into the system.
Each client must have two people trained up as Super Users on AXLR8 systems.
Super User Responsibilities
A Super User must (amongst other things):
- Support other staff within their business using AXLR8 unless some day-to-day details are documented and delegated to team leaders
- Perform systems admin tasks such as changing screens labels and creating reports and templates
- Add and change user credentials
- Set security rules and user restrictions for GDPR and other reasons
- Make sure business processes and contractual agreements and business policies are reflected in AXLR8.
- Contact AXLR8 support.
- Discuss new enhancements with AXLR8
- document how the system facilitates internal procedures and workflow – perhaps with crib cards, user instructions or descriptions on the AXLR8 Staff mobile worker app.
As you can see from the above list, this is a senior management position. Normally, at least one Super User is a director of the company if it is under 100 employees.
AXLR8 Super User Qualifications
The Super User must have the following capabilities.
- Be in a senior (probably leadership) position and understand the business policies and practices and KPIs and the legal environment in which the business operates. For example, they will be aware of the employment and other commercial compliance necessary for the company. They will understand their company’s goals so that they see ho a system can help and make decisions and trade offs. They will be a numerate, manager and understand ignorance of the tax, employment, privacy and other laws is not an excuse.
- The Super User must also have a thorough understanding of how AXLR8 works. That applies both as a user in each of the different teams and departments and as a Systems Administrator controlling access and other parameters.
- Be trusted to make decisions by the senior management team and have the consultation and communications skills to bring staff along with business process changes.
User Admin
To reactivate a disabled login, you must be a Super User. What is an AXLR8 SuperUser? Read more here.
Step 1 – Go to the ‘Admin Menu’ on the left-hand menu.
Step 2 – Select ‘User Admin’
Step 3 – From the ‘Disabled’ dropdown list search for the staff member you need to reactivate.
Step 4 – Click the Activate button
Once the Staff Member/Admin Member has been reactivated, they will be able to log back into the system.
If you either
- click on “Promote to staff” or
- set the JAS (Job Application Status) to a hired value as determined by your company
then the person becomes “Staff”. They may never actually work for you or get paid at this stage but
- they will have access to the Staff Portal and AXLR8 Staff app and
- they can be booked for
- pre-planned vetting workshops and interviews and for
- shifts and events.
At a point in your staff acquisition and selection process, you will make a decision to offer them employment and eventually hire them. We call this process “Promote to staff”. In some AXLR8 ATS systems with a high vetting requirement, the link may also be called “Invite to Interview” or similar. The reason for this is they are required to bring a number of original documents to an interview workshop such as PoID, PoA, and much more Also, several weeks of BS7858 vetting carry on during their initial work shifts.
So, what does “Promote to Staff” actually do?
This simple click takes the contact details of the applicant and automatically does everything you need to create the User account and employee record.
- creates a user account on the system with “Staff” rights. That mean they can log in to the staff web portal and also access the “AXLR8 Staff” app on their mobile phone.
- Normally creates the next employee number and allocates it. However, in some businesses this may be done elsewhere and AXLR8 have several varietions and you can manually take a personel number form another system if you wish.
- Additionally, various pieces of data collected during their candidate journey are registered in their employee records including.
- Autocreation of a unique log in name. Normally
(perhaps with a number added if a duplicate) - Password (encrypted) used in the application. (password reset if the staff member has forgotten)
- More readable friendly name (can containg duplicates)
- Contact details such as email (for password reset) and mobile number,
- Right to work details such as passport and visa numbers, types, expiries, NI number, etc.
- Date of Birth
- Bank account details if collected already
- Default Staff portal log in
- Default chosen by your business for whether or not they can see payroll on the app.
- Autocreation of a unique log in name. Normally
Sends Welcome/Job Offer email
It normally sends out an automatic welcome letter depending upon data still to be collected from that staff member, it may also contain a set of instructions and a link to a further job acceptance form or tell them to fill in the details on their AXLR8 Staff app. Please check that yours is in your package and that its template contents have been created, approved and configured for your company.
Each client must have two people trained up as Super Users on AXLR8 systems.
Super User Responsibilities
A Super User must (amongst other things):
- Support other staff within their business using AXLR8 unless some day-to-day details are documented and delegated to team leaders
- Perform systems admin tasks such as changing screens labels and creating reports and templates
- Add and change user credentials
- Set security rules and user restrictions for GDPR and other reasons
- Make sure business processes and contractual agreements and business policies are reflected in AXLR8.
- Contact AXLR8 support.
- Discuss new enhancements with AXLR8
- document how the system facilitates internal procedures and workflow – perhaps with crib cards, user instructions or descriptions on the AXLR8 Staff mobile worker app.
As you can see from the above list, this is a senior management position. Normally, at least one Super User is a director of the company if it is under 100 employees.
AXLR8 Super User Qualifications
The Super User must have the following capabilities.
- Be in a senior (probably leadership) position and understand the business policies and practices and KPIs and the legal environment in which the business operates. For example, they will be aware of the employment and other commercial compliance necessary for the company. They will understand their company’s goals so that they see ho a system can help and make decisions and trade offs. They will be a numerate, manager and understand ignorance of the tax, employment, privacy and other laws is not an excuse.
- The Super User must also have a thorough understanding of how AXLR8 works. That applies both as a user in each of the different teams and departments and as a Systems Administrator controlling access and other parameters.
- Be trusted to make decisions by the senior management team and have the consultation and communications skills to bring staff along with business process changes.
Vetting
5 year employment history is required in BS7858 Vetting for many regulated jobs. Secuirty, airports and care are examples.
If an applicant cannot recall all the dates or employment details then they can request this from HMRC. Please note, this could take up to 14 days to arrive.
Option 1. Apply online
https://www.gov.uk/guidance/hmrc-subject-access-request
- Go to www.gov.uk
- Search for HMRC subject access request
- Tap the link that is under how to get your requests and apply for a SAR online
- Complete with full information and submit
Apply by email – Please ensure you are emailing info.sars@hmrc.gsi.gov.uk and that you are providing all the information below
- Full name (including middle names)
- DOB (DD/MM/YYYY)
- National insurance number (AA 00 00 00 A)
- Full current address (including postcode)
- Any previous addresses (if you have moved in the last five years to your current address, please provide your previous address that you lived in)
- What years you are applying for (please ensure you request a full five years from the date you are applying. If the date today is 01/02/2025, please request from 2020 until 2025)
- Reason to why you are applying, for example; you are applying for a position at Happy Town and a five-year history check is mandatory for you to begin work with us.
Option 2. Apply by phone
Call HM Revenue on 0300 200 3300, provide all your details and ask for a five year employment history letter which you will receive by post.
Candidate Journey
You can plug this into your application process. Simply use the Employment History Question type in AXLR8 AFB (Application Form Builder).
Integrated with BS7858 in the AXLR8 Vetting module?
Then the details will go straight into the BS7858 vetting section and the emails and can be used to auto launch the reference letters to obtain confirmations of the facts from previous employers.
There are many tools for doing this in AXLR8. Let us look at three examples.
Application Form
Using AXLR8 Application Form Builder (AFB) you can create conditional questions. These can be made to follow the logic shown in this flowchart.
Vetting Workshop
Using AXLR8 Vetting to support your BS7858 process you can collect and approve all the data you need including:
- Proof of ID
- Proof of Address
- Confirmation correspondence from 5 years employment history
- Visas and other BRP and work documents
- SIA badge checks
- Others.
The original documents s should be checked and authenticated by a qualified vetting manager
Online Checks with Rightcheck
Checking online is integrated with AXLR8 using the Rightcheck service. It works seamlessly within the AXLR8 Job Application Journey. There are more details in this article.
Feel free to contact your Support consultant if you do not find your answers in FQ or enough training material. Also, get in touch with your account manager if you have not purchased the modules listed above.
Once you have run through all your selection procedures and wish to add an applicant to your “staff bank” for shifts, you simply find their record and
- press “Promote to staff”
or
- set the JAS (Job Application Status) to a hired value as determined by your company.
then the person becomes “Staff”.
They may never actually work for you or get paid at this stage but they will have access to the Staff Portal and they can be booked for shifts and events and be able to add and update certain details in their own staff records.
At a point in your staff acquisition and selection process, you will make a decision to offer them employment and eventually hire them. We call this process “Promote to staff”. In some AXLR8 ATS systems with a high vetting requirement, the link may also be called “Invite to Interview” or similar in companies in a regulated industry with high vetting standards. Examples include security staffin, the care sector and airports.
What happens when I promote somone to staff?
Their employee record is set up and they get their welcome, offer letter explaining any further information required for acceptance/payroll and vetting processes as well as access to the AXLR8 Staff app.
Further details on the promote to staff automation.
Collecting further details post-hiring
Some employers may decide to collect certain information of a private nature after the decision to hire.
AXLR8 provides many options for this and any continual staff details updates required. The main tools are:
- AFB (AXLR8’s Application Form Builder)
- AXLR8 Vetting Module (which is for managing your BS7858 compliance) and
- the AXLR8 Staff app (also available as a web portal)
Further details on collecting data following job offer or hired stage
AXLR8 provides many options for collecting further information during employment. You can continue to update staff details when required.
The main tools which may be used, in combination or alone, are:
- AFB (AXLR8’s Application Form Builder)
- AXLR8 Vetting Module (which is for managing your BS7858 compliance) and
- the AXLR8 Staff app (also available as a web portal).
Second Application form
Once hired, you may send staff to a secondary form built using AFB . This may ask for details for payroll and the completion of the form may be set up for the applicant a condition of employment. It is sometimes called the “Job Offer Acceptance” form. That is because it contains the job contract and one or more acceptance confirmations. It may contain requests for bank details and other information you that is inappropriate at an earlier stage in the candidate journey.
In regulated industries such as Care sector, Security, Airside staffing, your Vetting procedures may also be carrying on for a period using a standard such as BS7858. In security agencies, BS7858 vetting can carry on for 12 weeks whilst the staff are working on shifts.
Staff App or Staff Portal
Your company’s AXLR8Staff App (or staff web portal) allows the addtion and up date of information by the staff member.
If some details were not collected during the employment selection process, the staff member may also add them through the App or Staff Portal. These details may include payroll details, bank account details, date of birth, rights to work information. It may be that your business needs to see originals of documents as part of your process and, in that case, the HR team can upload scans/pictures of them and sign them off online.
You can find more detail here.
If you either
- click on “Promote to staff” or
- set the JAS (Job Application Status) to a hired value as determined by your company
then the person becomes “Staff”. They may never actually work for you or get paid at this stage but
- they will have access to the Staff Portal and AXLR8 Staff app and
- they can be booked for
- pre-planned vetting workshops and interviews and for
- shifts and events.
At a point in your staff acquisition and selection process, you will make a decision to offer them employment and eventually hire them. We call this process “Promote to staff”. In some AXLR8 ATS systems with a high vetting requirement, the link may also be called “Invite to Interview” or similar. The reason for this is they are required to bring a number of original documents to an interview workshop such as PoID, PoA, and much more Also, several weeks of BS7858 vetting carry on during their initial work shifts.
So, what does “Promote to Staff” actually do?
This simple click takes the contact details of the applicant and automatically does everything you need to create the User account and employee record.
- creates a user account on the system with “Staff” rights. That mean they can log in to the staff web portal and also access the “AXLR8 Staff” app on their mobile phone.
- Normally creates the next employee number and allocates it. However, in some businesses this may be done elsewhere and AXLR8 have several varietions and you can manually take a personel number form another system if you wish.
- Additionally, various pieces of data collected during their candidate journey are registered in their employee records including.
- Autocreation of a unique log in name. Normally
(perhaps with a number added if a duplicate) - Password (encrypted) used in the application. (password reset if the staff member has forgotten)
- More readable friendly name (can containg duplicates)
- Contact details such as email (for password reset) and mobile number,
- Right to work details such as passport and visa numbers, types, expiries, NI number, etc.
- Date of Birth
- Bank account details if collected already
- Default Staff portal log in
- Default chosen by your business for whether or not they can see payroll on the app.
- Autocreation of a unique log in name. Normally
Sends Welcome/Job Offer email
It normally sends out an automatic welcome letter depending upon data still to be collected from that staff member, it may also contain a set of instructions and a link to a further job acceptance form or tell them to fill in the details on their AXLR8 Staff app. Please check that yours is in your package and that its template contents have been created, approved and configured for your company.