In this AXLR8 FAQ section we collect some questions that often get asked by clients. If you cannot find the subject you need, please try the search function (top RHS) or click on te headings below to expand them. Also, try the courses link for training videos. Failing that, AXLR8 have a helpdesk for client support with trained consultants available during office hours.

Please also see our definitions page for some useful workforce management buzzwords!
AXLR8 Staff app
A client asked how they could send a regular, recurring email out to staff to remind them to check their days, hours and pay on the AXLR8 Staff App. It was important the check was done by their brand ambassadors before the payroll run – not afterwards. Accounts department were previously receiving corrections and queries after the payroll run. That meant much more admin. If you use AXLR8 you will be familiar with the Pay Queries function in the app which already saves admin and provides an audit trail.
So they created a newsletter template in AXLR8 Newsletter Builder. It explained why it was better for everyone for the staff to check their hours and pay in the pay tab before payday each week.
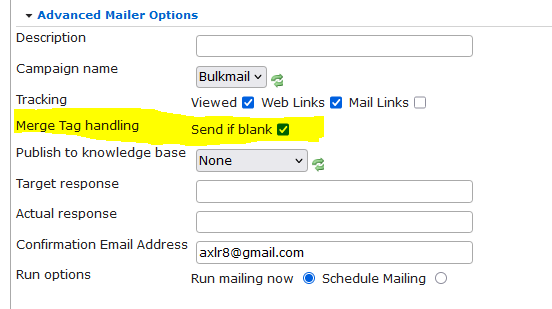
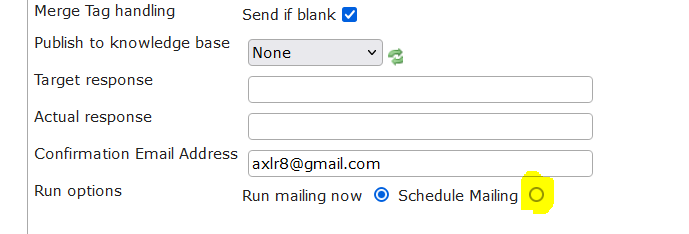
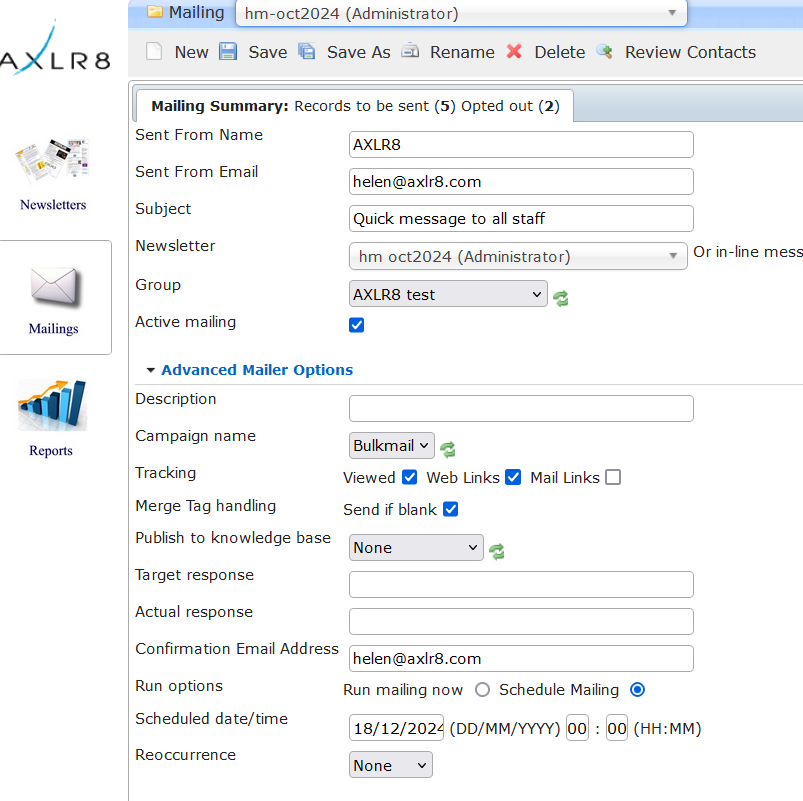
Once the template was set up and the relevant staff added to a dynamic search, they set up the recurring mailing schedule. To do this, they went into the mailings tab as usual and selected a sender and the newsletter template. Then they opened the Advanced Tab. Sounds scary but it is actually full of useful options. Your options may be different to the screenshot depending on what social media publishing functions you have configured.
Then they selected the schedule options they wanted. This is shown at the bottom of the screen shot below.
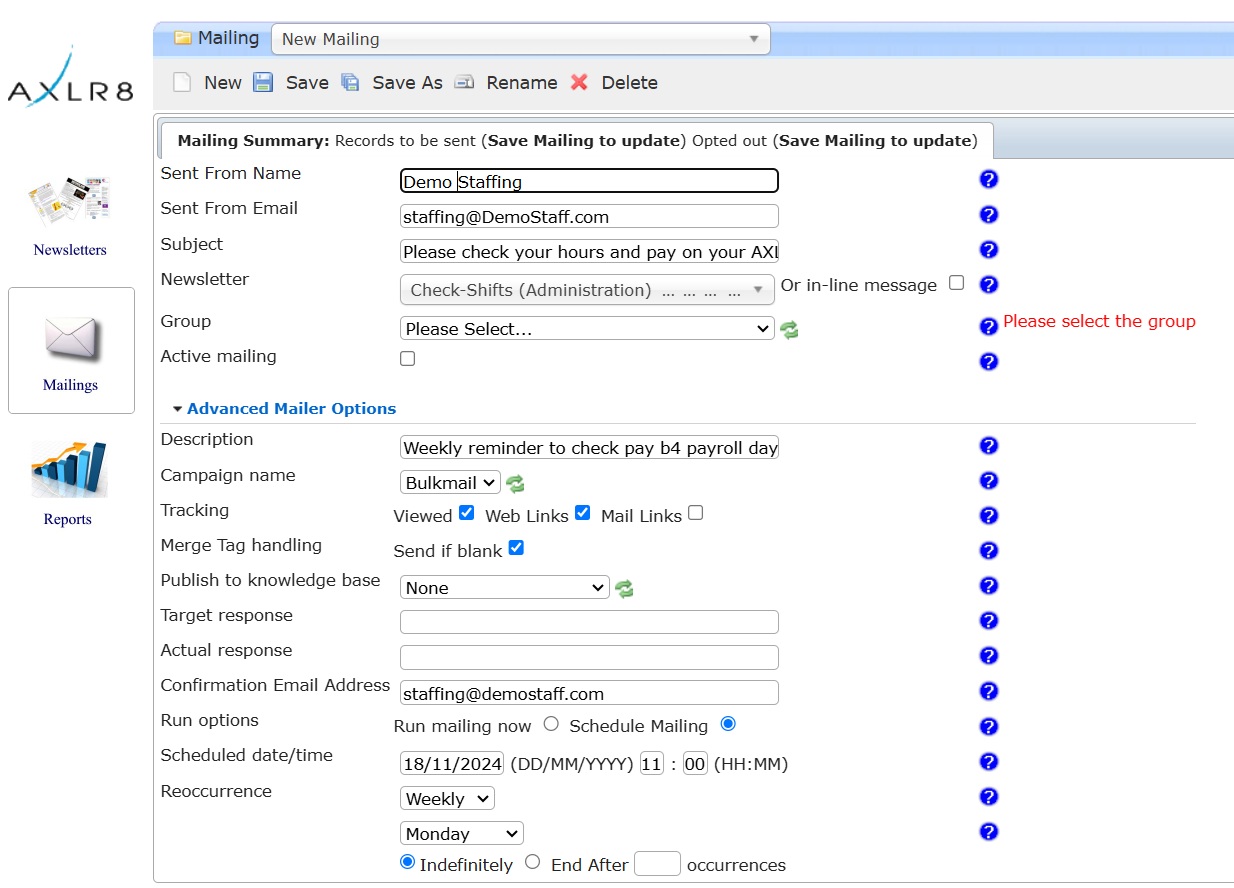
As you can see, they changed the “Run Options” from just running straight away to “Schedule Mailing”.
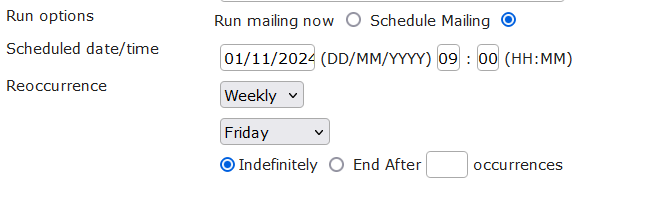
Then they chose “Weekly” and asked the system to send it every Monday at 11 a.m. Obviously, we then took out an PII before making this screenshot.
Other uses of repeating email templates
Other reasons to send recurring mailings include debt collection and certain marketing follow ups. Let us know if we can assist you to set these up. One of our customers used to send out a weekly mailer to local businesses with a new account form for her taxi company and an incentive. In a month, it brought her two of the largest companies in the area as clients.
Intelligent Mailings
If your mailing must go out on special events in specific conditions with specific contents, you may need to use AXLR8 Trigaware TM . In that case, please contact Support
Mailing Manager
Obviously the answer is YES of course. If you are short of time and need to get some words out before close of play, you can skip the Newsletter Builder part of Mailing Manager altogether.
Click the Mailings tab of the Mailing Manager. Enter the friendly name of the sender, email of sender, and email subject line. Tick the option to send an “in-line message” and the text panel will open, as in screenshot below.
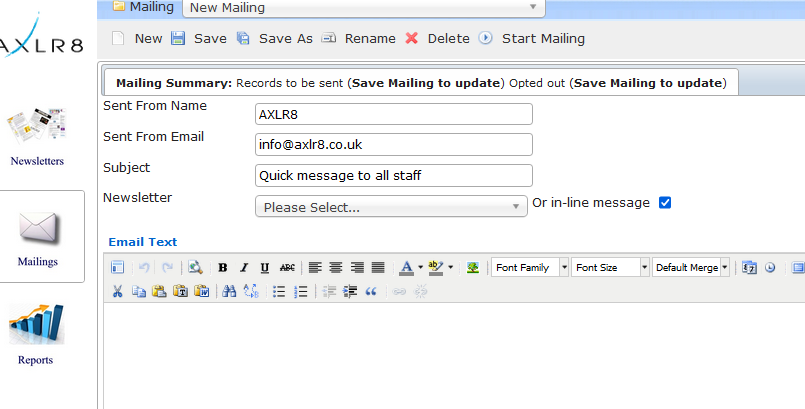
Type your message in the panel. You still have access to most of the formatting icons as in the full Newsletter Builder, so can add colour, images etc. should you want to do so.
Lastly, from the “Group” dropdown list, select the distribution list that you wish to send to, and click “Active Mailing”. Save the mailing on the top menu, and click “Start Mailing”.
This is a much quicker method of sending messages out when design and formatting is less important than the message itself.
Yes, great idea to make the recipient think that they are not part of a huge batch of emails being sent out, and to include pertinent details for their own company.
The dropdown field on the toolbar, initially set to “Default Merge” is used for this purpose. Within the dropdown you will see various options for inclusion.

Create your mailer, inserting values from the list as appropriate:
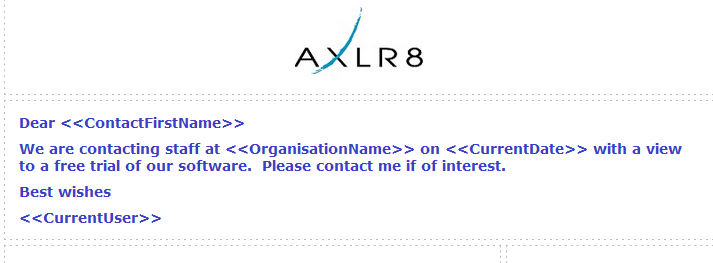
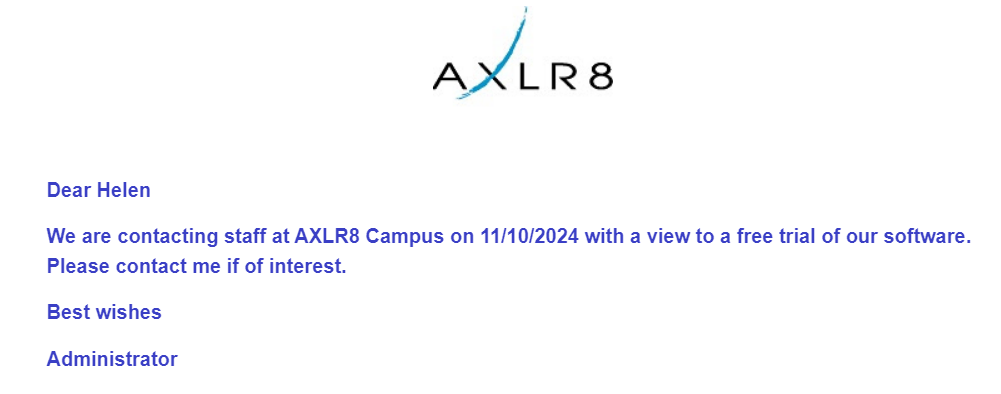
When saved and sent out, values for each recipient will be substituted from the values in the database.
Word of Warning! If there is no ContactFirstName or any other data missing for any of the recipients, the mailing will not send and errors will be highlighted on the Completed Mailing report, as below:

You may want it to not send if there is data missing – for example, if sending a quote and there is no price set for a particular client. If you would like it to send regardless, then ensure that the “Merge Tag Handling” checkbox is ticked when sending.
Be aware of the impact though, that if there is no ContactFirstName in the database for one of the recipents, a space will be substituted instead. As a result, many of our clients will say “Hi” instead of “Dear”, thus minimising the impact of poor data!
The “Default Merge” dropdown is a mere sample of the most popular fields to be incorporated into a mailer. AXLR8 can provide tags for most fields in the database, so if the field you would like to merge in is not shown in the list, please contact our Helpdesk.
Yes, and more importantly you can see who has clicked the links you have embedded in your mailer – so important to include these!
We usually suggest leaving it 24 hours after sending before reviewing the results of a mailing as recipients do not invariably open an email immediately it hits their inbox.
Go to Reports within the Mailing Manager. Click the “Completed Mailings” tab at the top. Then click the icon to the left of the mailer in question. Results of that mailing are displayed as in example below. Click “Export” to download all the information to a .csv file.
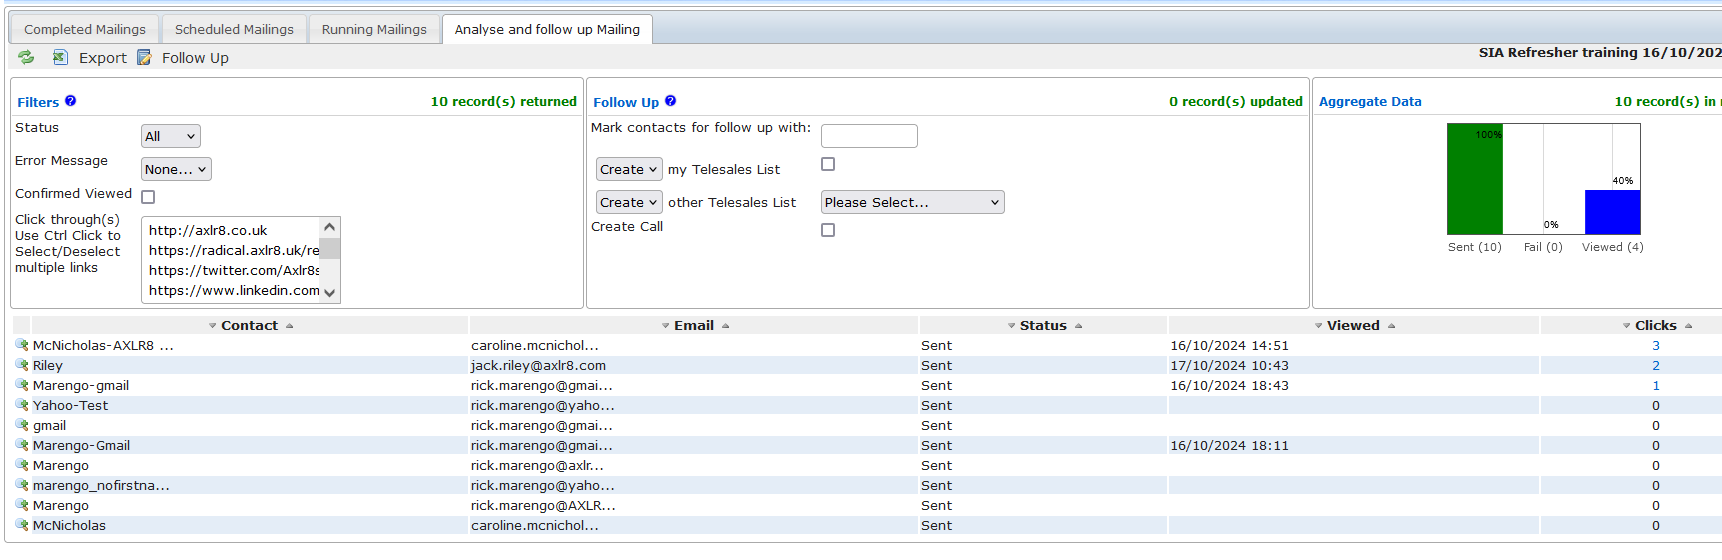
In the 2nd column, the emails are displayed for those that were sent to. In the “Viewed” column, you can see the date and time that the emails were open. This only registers if the email was actually opened and images downloaded, so it is possible for your email to have been read in the Preview pane within Outlook, but not have a date / time in this column.
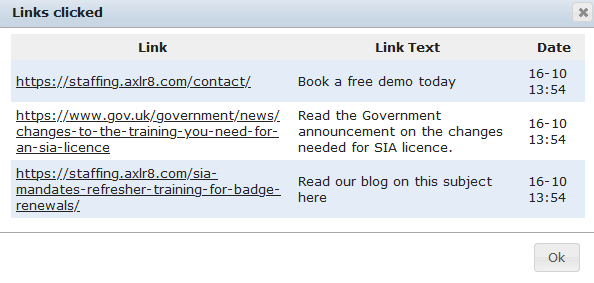
The final column displays the number of links within the email that have been clicked. The recipient at the top of the list has clicked through to 3 pages. Click the “3” and details of the links clicked are shown, as below.
Especially useful if you have sent out a large mailing, you can display a list of all recipients that have clicked a specific link. For example, if you wanted to see all those that had clicked through to read your blog article on the subject, click on the appropriate link within the Filters panel, and then on the “Refresh” link in the top left corner.
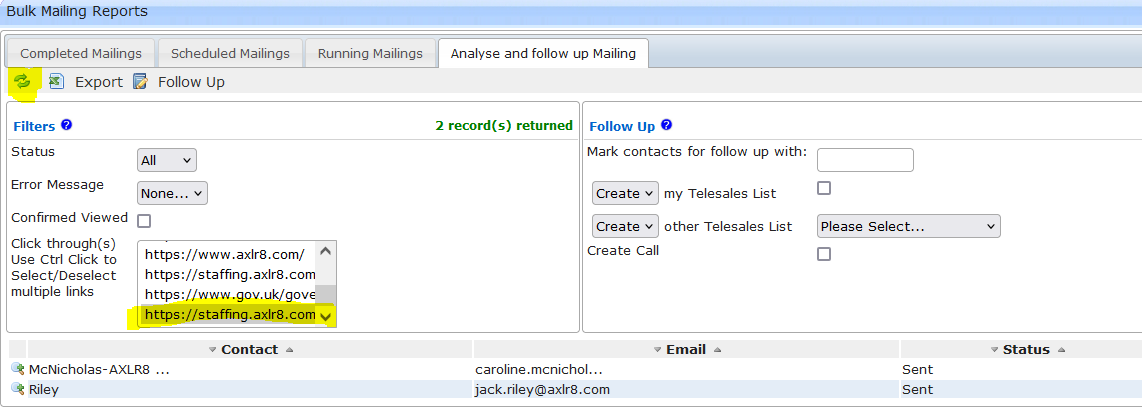
You can see that 2 people have clicked this link from the report. If you have many links to scroll through, pause and mouse over each link, and you will see more details of the link to help identify which is the one needed.
It is possible to flag those recipients that have viewed the mailing and / or clicked a specific link within the database, for follow up with a further newsletter or by telesales. This is covered by another FAQ.
Yes, and this a great idea for a marketing email!
Develop the mailer and save it, making sure the content remains pertinent for all times of the year.
When setting up the mailing, within the Advanced Mailer Options, change the “Run mailing now” option to “Schedule Mailing”.
Further options will then appear. In the “Scheduled date/time” fields enter the date and time of the first occurrence of the mailing.
In the Reoccurrence dropdown, select whether the mailer should be sent daily, weekly or monthly. The next dropdown will differ according to whether you have selected daily, weekly or monthly. In the example below, “Weekly” has been selected, so the day of the week needs to be chosen. If “Monthly” is selected, the date within the month needs to be chosen. Finally, select whether the mailer should run indefinitely as below, or if for example it needs to run weekly for a full year, set it to 52 occurrences.
You can check on the Mailings that have been scheduled by clicking on the Reports tab, and then Scheduled Mailings.

It is easy to see the mailer with subject line, group and scheduled date/time in the queue. If any changes need to be made, go back to the Mailings tab, select the mailer, change appropriately and re-save. Delete the mailer within the Mailings tab if you need to abandon the scheduling.
Newsletters can be as simple or complex as you like. This article demonstrates the simple creation of a mailer with words, pictures, and all-important hyperlinks.
Access the Newsletter Builder by clicking “Newsletters” from the Mailing Manager menu.
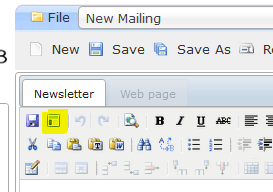
Within your system, there will be some pre-setup “Building Blocks”. To begin with, it is easiest to start with one of these. Click the icon highlighted below to “Insert Predefined Building Block”.
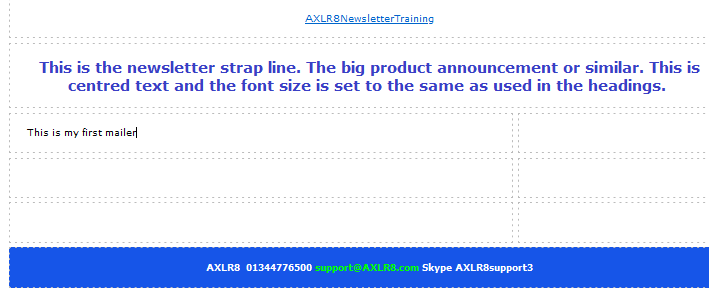
You will be presented with a drop down list of all available templates. Select one that looks appropriate and click “Insert”. You will have the basis of a newsletter ready.
Add text by positioning the cursor and just type:
To change font colour, positioning, styling, firstly highlight the text, and then click the relevant icon:

Likewise, to change font, or font size, use the dropdown options below:

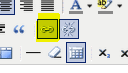
To add a picture, position the cursor where you would like the image to be. Then click the “Insert / Edit Image” icon as below:

Ideally have the image correctly-sized already on your PC and browse for this using the Upload button. Otherwise you can define the size later with the “Appearance” tab. Alternatively, if the image is online already, the URL can be entered directly into the “Image URL” field. Whichever method is used, then click Insert””Ideally have the image correctly-sized already on your PC and browse for this using the Upload button. Otherwise you can define the size later with the “Appearance” tab. Alternatively, if the image is online already, the URL can be entered directly into the “Image URL” field. Whichever method is used, then click “Insert”.
It is essential to include hyperlinks as click throughs can be measured in Mailing Manager reports, and also using Google Analytics. To make the AXLR8 logo click through to the AXLR8 website, firstly click the logo:
Then click the Link icon:
Add the appropriate URL as below and always select the target to open in a new window, especially if the mailer is to be published online.
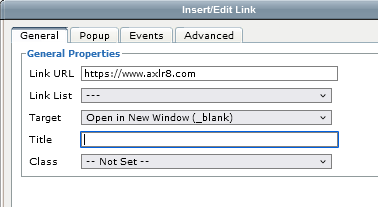
Click to Update.
This FAQ has covered the basics, but there are many more options on the toolbar with which you can enhance your mailers. Please read further FAQs, or just experiment!
Finally, do not forget to SAVE your work! Click “Save” or “Save As” on the top menu and name appropriately.
Every mailing sent out has the legally required “Unsubscribe” link in the footer. When this is clicked by the recipient, they are taken to a separate page to complete the opt out process. Once finalised, the “Send HTML Mailshots” lookup for their contact is set to “No”. For any future mailing, even when their name may appear in the mailing list, they will be excluded automatically.
To search for those that have unsubscribed and will not be benefitting from any future information from your company, you just need to search for those contacts where the “Send HTML Mailshots” lookup = “No”.
On the main screen, click the “Contact” dropdown list and scroll down to select “Send HTML Mailshots”. Double click in the empty field immediately to the right of this and double click “No”. The search criteria will be entered in the search panel to the right. Click on Search below, as highlighted in the screenshot.
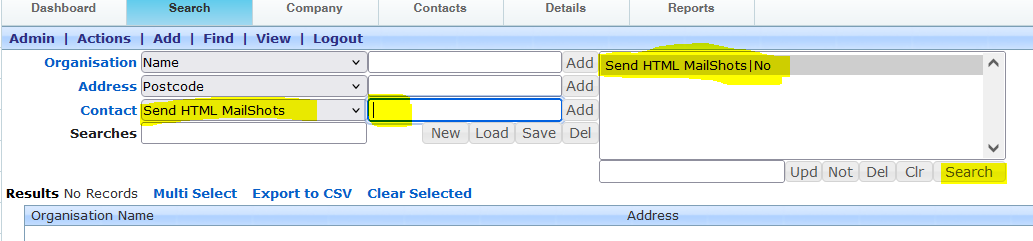
All contacts that have unsubscribed from mailings will be listed below.
This demonstrates the importance of fine tuning mailing lists so that only contacts that are likely to be interested in the content of your mailing receive it, minimising the risk that they will unsubscribe. Once unsubscribed, they are lost for ever, unless a phone call can persuade them to resubscribe of course.
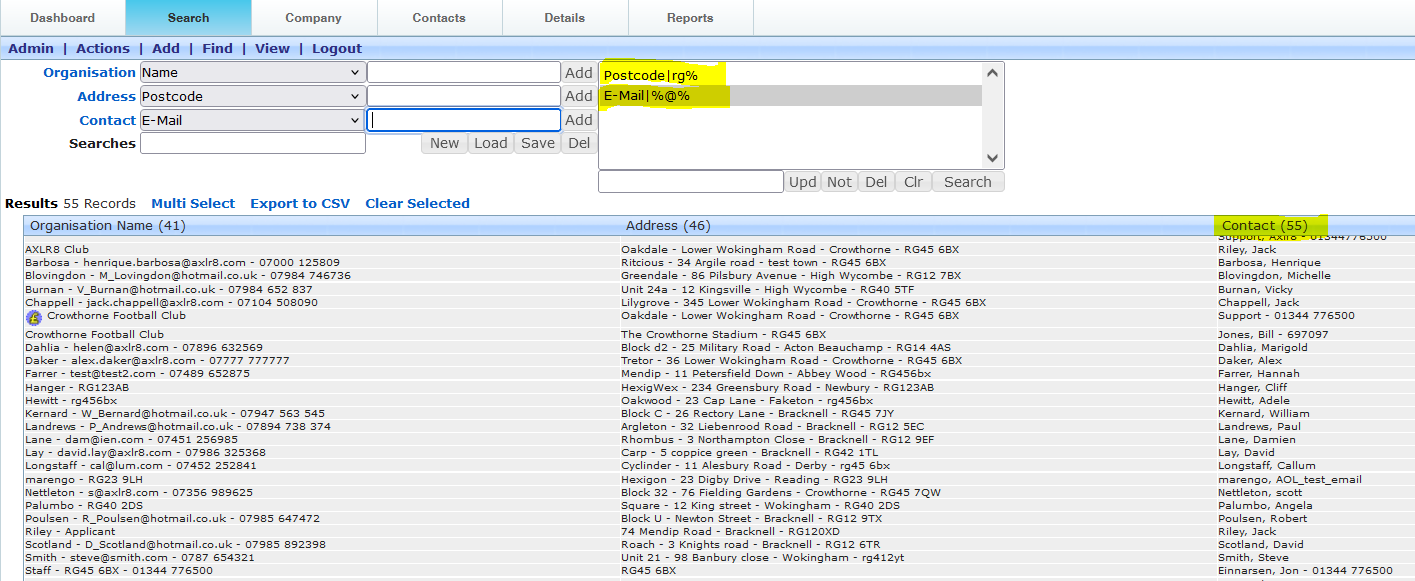
The key feature of the Mailing Manager is to send out the same information in bulk to everyone on a specific distribution list. The list should be defined as accurately as possible so that the content is pertinent to the recipient. The last thing you want is for them to unsubscribe because it is not of interest, as then they are lost to you for ever! The Mailing manager automatically excludes anyone that has unsubscribed from future mailings.
Build your mailing list from the main search screen. In the below example, anyone on the database within the RG postcode area, with an email address, has been found. There are 55 of them.
Click “New” as highlighted below.
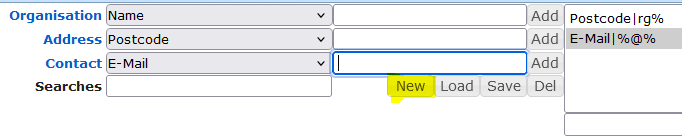
Enter a name for your new “Group” and click OK. Make sure the name explains accurately what the list is.
The list name will automatically appear in the dropdown for selection when sending any future mailing.
I have scheduled a mailing but now don’t want to send it, or want to change it.
Firstly, go the Mailings > Reports > Scheduled Mailings tab, and note the Mailing name. In the case below, it is “hm-oct2024”.

Go to the Mailings tab and find the appropriate mailing in the drop down list.
If you want to change the date / time that the mailing is scheduled to be sent, scroll down to where this is specified, change accordingly and save.
If you want to stop the mailing being sent at all, click the “Delete” button on the top menu to remove the mailing. When you return to the list of Scheduled Mailings in the Reports tab, the mailing in question will not be detailed.
Sending out a mailing just ties together the newsletter that you have created with the mailing list to send to. You add a catchy subject line, and state when it should go.
Click on the Mailings button within the Mailing Manager.
On the Mailings page, you need to firstly enter the email to send from – this may well default to the company email that has been defined, but this can be overwritten.
Think of a subject line that will entice recipients to open, read and digest the contents of the email that you have worked so hard to create.
Select the newsletter that you have built from the dropdown list.
Select the “Group” or distribution list to send to, and click the “Active Mailing” checkbox.
On the lower panel, ensure that the Tracking field has the “Viewed” and “Web Links” ticked, as these will then be monitored in the Reports later.
Add an email address in the “Confirmation Email Address” field for a mini report to be sent to once the mailing has completed.
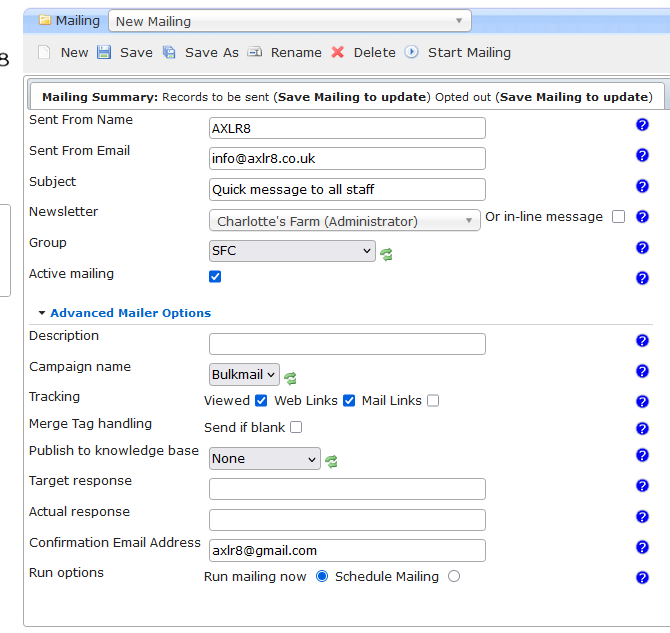
Save your Mailing!
Click Start Mailing on the top menu.

You will then be notified of the number of emails you will be sending out, and if any of them have unsubscribed previously. Emails are not sent to contacts that have unsubscribed.
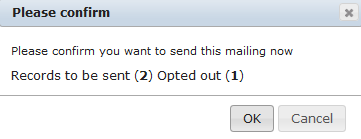
Click OK to send the mailing.
A client asked how they could send a regular, recurring email out to staff to remind them to check their days, hours and pay on the AXLR8 Staff App. It was important the check was done by their brand ambassadors before the payroll run – not afterwards. Accounts department were previously receiving corrections and queries after the payroll run. That meant much more admin. If you use AXLR8 you will be familiar with the Pay Queries function in the app which already saves admin and provides an audit trail.
So they created a newsletter template in AXLR8 Newsletter Builder. It explained why it was better for everyone for the staff to check their hours and pay in the pay tab before payday each week.
Once the template was set up and the relevant staff added to a dynamic search, they set up the recurring mailing schedule. To do this, they went into the mailings tab as usual and selected a sender and the newsletter template. Then they opened the Advanced Tab. Sounds scary but it is actually full of useful options. Your options may be different to the screenshot depending on what social media publishing functions you have configured.
Then they selected the schedule options they wanted. This is shown at the bottom of the screen shot below.
As you can see, they changed the “Run Options” from just running straight away to “Schedule Mailing”.
Then they chose “Weekly” and asked the system to send it every Monday at 11 a.m. Obviously, we then took out an PII before making this screenshot.
Other uses of repeating email templates
Other reasons to send recurring mailings include debt collection and certain marketing follow ups. Let us know if we can assist you to set these up. One of our customers used to send out a weekly mailer to local businesses with a new account form for her taxi company and an incentive. In a month, it brought her two of the largest companies in the area as clients.
Intelligent Mailings
If your mailing must go out on special events in specific conditions with specific contents, you may need to use AXLR8 Trigaware TM . In that case, please contact Support
Payroll
A client asked how they could send a regular, recurring email out to staff to remind them to check their days, hours and pay on the AXLR8 Staff App. It was important the check was done by their brand ambassadors before the payroll run – not afterwards. Accounts department were previously receiving corrections and queries after the payroll run. That meant much more admin. If you use AXLR8 you will be familiar with the Pay Queries function in the app which already saves admin and provides an audit trail.
So they created a newsletter template in AXLR8 Newsletter Builder. It explained why it was better for everyone for the staff to check their hours and pay in the pay tab before payday each week.
Once the template was set up and the relevant staff added to a dynamic search, they set up the recurring mailing schedule. To do this, they went into the mailings tab as usual and selected a sender and the newsletter template. Then they opened the Advanced Tab. Sounds scary but it is actually full of useful options. Your options may be different to the screenshot depending on what social media publishing functions you have configured.
Then they selected the schedule options they wanted. This is shown at the bottom of the screen shot below.
As you can see, they changed the “Run Options” from just running straight away to “Schedule Mailing”.
Then they chose “Weekly” and asked the system to send it every Monday at 11 a.m. Obviously, we then took out an PII before making this screenshot.
Other uses of repeating email templates
Other reasons to send recurring mailings include debt collection and certain marketing follow ups. Let us know if we can assist you to set these up. One of our customers used to send out a weekly mailer to local businesses with a new account form for her taxi company and an incentive. In a month, it brought her two of the largest companies in the area as clients.
Intelligent Mailings
If your mailing must go out on special events in specific conditions with specific contents, you may need to use AXLR8 Trigaware TM . In that case, please contact Support